Dialogue Editor
The Dialogue Editor is the tool you use to create and write a Dialogue.
A Dialogue is an asset that holds a structured tree of text. It is primarily meant to hold conversations between one or more characters that can be turned into playable, interactive sequences — but it is first and foremost a data container, so it can also drive other mechanics such as written documents, diegetic computer interfaces, and so on.
Create a Dialogue
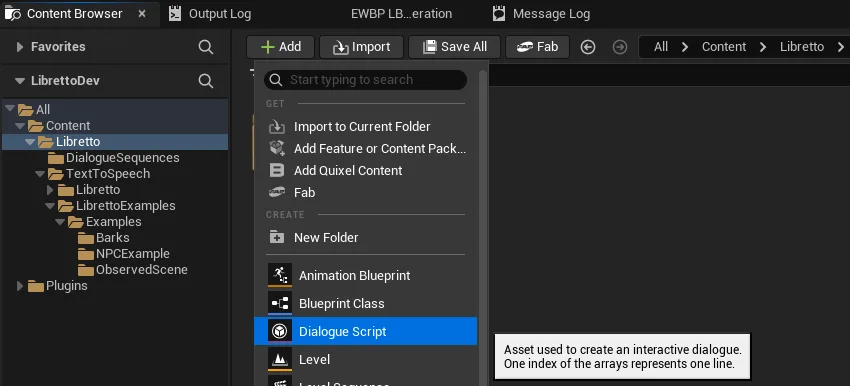
Right-click in the Content Browser ▸ Dialogue. By convention, always prefix the asset with
D_.
Characters
So that each content line can be attributed to a character who speaks (Speaker) and/or listens (Listener), you usually start a dialogue by adding the characters taking part in it.
Use the yellow toolbar buttons to add a character, and — after selecting one in the list — to remove or replace it.
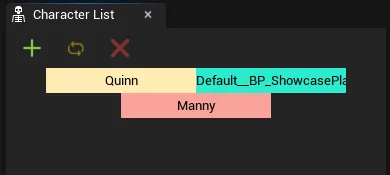
Each character is assigned a color used on its lines in the main view. Drag characters in the list to swap their colors.
To be usable in a Dialogue, a character Blueprint must implement the LBRDialogueCharacter
interface.
Tip
Most projects have a single base class that all characters derive from. If that base class implements the interface, you can create one Blueprint per character from it (or from another class that fits your project).
Tip
A base class for intangible characters (a voice on the phone, a narrator…) — see
ULBRIntangibleCharacter — only needs to define voice parameters and does not require an
instance in the level.
The default display name is the class name. To override it, implement
LBRGetCharacterName. A good pattern is to implement it once in the base class from a
Name variable that you fill per character. Prefer localized text, since this name may be
shown in-game (subtitles, for example). The shipped ALBRSimpleDialogueCharacter base returns
its CharacterName property this way.
Subdialogues
Subdialogues are the essential structural element of a Dialogue. They let you split a dialogue logically, in order to:
- Hold different conversations between the same characters in different contexts (e.g. one subdialogue when the player talks to a character without knowing a key piece of information, and another once they know it).
- Separate different setups that need specific handling at generation time (e.g. one subdialogue for a one-on-one, another when a third character joins).
- Make long dialogues easier to read and navigate.
- Structure content used in another context (e.g. one subdialogue per page when the dialogue describes a written document).
A Dialogue always contains at least one subdialogue. By default a Dialogue plays its first subdialogue; you can request a specific one by name. On entry, candidate subdialogues are evaluated in order — the first one that matches the requested name and whose condition passes is played.
The end of a subdialogue is the end of the Dialogue: use an explicit GoTo to jump to another subdialogue (only within the same Dialogue). The order of subdialogues in the list matters (see GoTo ▸ Next Subdialogue below).
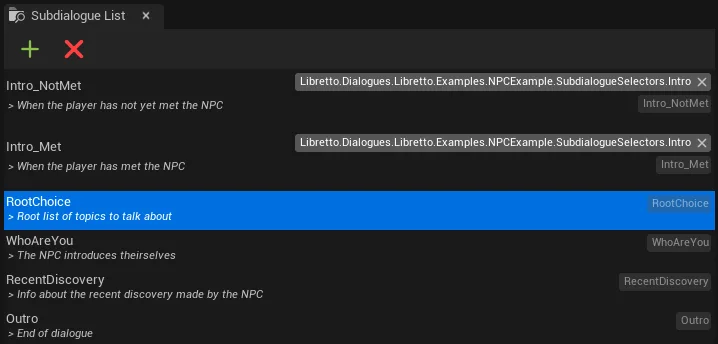
Double-click a subdialogue name to open it; each open subdialogue has its own tab in the main view. Each subdialogue can redefine its staging context (character placement, camera handling…), but the character list is shared by the whole Dialogue.
Subdialogue settings
Selecting a subdialogue shows its properties in the details panel:
| Property | Purpose |
|---|---|
| Name | Unique within the Dialogue. Used both to navigate the editor and to generate the tag identifying the subdialogue. |
| Selectors | Tags used to select this subdialogue specifically, or to group it thematically with others. |
| Condition | A dynamic condition that allows, or not, the subdialogue to play. |
| Stage Actor Class | The stage class instantiated at generation. Defines character placement and the kinds of cameras generated. |
| Dialogue Priority | The priority level used when two subdialogues compete. |
| Flags | Extensible configuration via LBRGameplayTagFlags. Even though they are not shown here, a subdialogue is considered to have all project default flags checked, unless it sets Libretto.Flags.Subdialogue.NoDefault. |
Lines
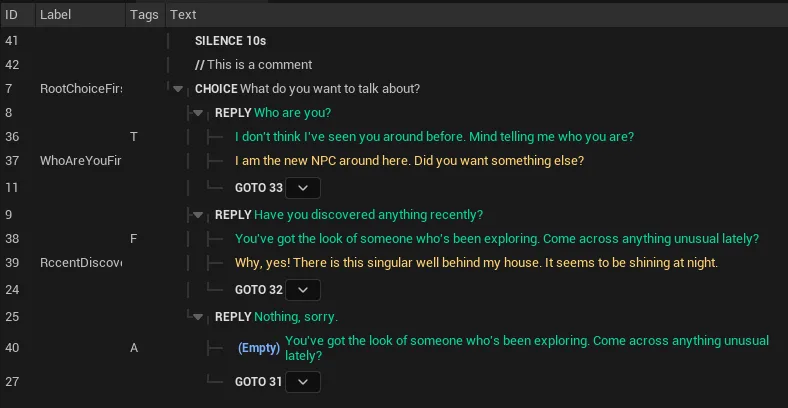
The basic unit of a Dialogue's content is the line. Most lines are spoken replies, but there are several types.
Each line has an ID that is unique within the Dialogue (a positive integer). You can also set an optional Label, currently used by GoTo lines.
In the intended use case (dynamic sequence generation), only the localized text of Text and
Reply lines is shown in-game — as subtitles or dialogue choices. That text is colored with the
Speaker's color; text on other line types is white.
Line types
| Type | Purpose | Key parameters |
|---|---|---|
| Text | The spoken content shown in-game as subtitles. | Stage Direction (used for audio recording — write it in English), Context, Speaker (with postures & emotions; if none, present, an audio track is generated), Listener (postures & emotions), Overlap Time (lets lines overlap so characters can interrupt each other). |
| Choice | Gives the player a set of responses (Replies) to choose from. | Time — time allotted to make the choice; 0 means no time limit. You may put Text lines inside a Choice, before the Replies: they play while the choice is displayed and can be interrupted once a choice is made. |
| Reply | A player response to a Choice. | Do Once (play only once), Default Reply (chosen when the Choice timer runs out), Display Condition (if false, the Reply is neither offered nor shown), Availability Condition (if false, the Reply is shown but greyed out and not selectable). |
| GoTo | Jump directly to the line given by its ID or Label. | Undefined (-1) ends the dialogue. Next Subdialogue (-2) jumps to the first line of the next subdialogue (or ends the dialogue if there is none). |
| If / ElseIf / Else | Branch the dialogue without player input. | Success Condition — if true, the player enters the branch; otherwise the next ElseIf/Else is evaluated. ElseIf/Else are optional and you may chain as many ElseIf as needed. |
| Silence | A simple pause. | Time — the pause duration. |
| Cinematic | Creates a sequence file with no spoken line (text-free cutscenes). | The text acts as a comment. |
| Comment | Visible only in the editor, no effect outside it. | Free text — handy to keep an idea, explain a concept, or clarify reading. |
Reading order after a block
Once a Reply or an If/ElseIf/Else block finishes, the next line played is the one
immediately after the Choice / the If-block, at the same indentation.
Invalid GoTo
A GoTo whose value matches no line is shown in red with the error in its tooltip. When a valid GoTo is selected, its destination is highlighted and you can jump to it with Go to line in the details panel.
Writing flow & shortcuts
Most of a dialogue is written from the keyboard, without touching the details panel. Select a line, type its text, then add the next line with one of two shortcuts:
| Shortcut | Adds |
|---|---|
Ctrl+Enter |
A new Text line with the same Speaker and Listener as the selected line — the same character keeps talking. |
Shift+Enter |
A new Text line with the Speaker and Listener switched — the other character answers. |
These two cover the bulk of a back-and-forth conversation: Ctrl+Enter to keep a character
speaking, Shift+Enter to hand the next line to the other character — no need to set the Speaker
and Listener by hand each time.
Swap on lines you already wrote
To flip who speaks and who listens on existing lines, select them and run Swap Speaker/Listener (right-click ▸ Swap Speaker/Listener).
The other line types are added from the toolbar buttons or the right-click menu — Add Silence, GoTo, Choice, Reply, If, Else If, Else, Comment, Cinematic.
Handy shortcuts
| Action | Default shortcut |
|---|---|
| Add Text — same speaker | Ctrl+Enter |
| Add Text — switch speaker/listener | Shift+Enter |
| Move line up / down | Alt+↑ / Alt+↓ (or drag & drop) |
| Find text in the dialogue | Ctrl+F |
| Refresh tabs | F5 |
| Play the line's voice / TTS | Space |
| Play through the following lines | Ctrl+Space |
| Step audio to next / previous line | Ctrl+→ / Ctrl+← |
| Browse the line's audio asset | Ctrl+Shift+Enter |
| Open the line's audio in Sequencer | Ctrl+Shift+Space |
Audio preview is not the final mix
Space plays the line's recorded voice (or its TTS if there is no recording), and Ctrl+Space
plays consecutively through the following lines. This preview does not reflect the audio
editing done in Sequencer — open the sequence or play it in the level for the real result.
Everything is rebindable
These are only the default bindings. Change any of them in Editor Preferences — search "Dialogue Editor" to find the Libretto command list.
Conditions
Several labelling features add layers to the Dialogue Editor UI. A condition lets a subdialogue, a Reply, or an If-branch depend on dynamic state (for example, checking whether a value is below a threshold).

See the Conditions page for authoring condition Blueprints.
Dialogue-played checks
To test "has this dialogue/subdialogue been played", use the dedicated
ULBRDialogueDoneCondition rather than a hand-written GPVar-path condition. See GPVars &
Conditions.
Actions
On every line type except Cinematic and Comment, you can add actions through the details
panel. Actions are Blueprints executed when the line plays — a very flexible hook to do anything
during a dialogue: give an item to an NPC, trigger a gameplay event, push UI, and so on.
The base class for an action is ULBRAction. Override notably DoAction (run when the
line plays in-game) and GetLabel (adds a layer in the Dialogue Editor UI).

Tags & Flags
- Add Tag / Remove Tag raise or lower GPFlags directly (at the root).
- Flags attach metadata to a line, interpreted at generation or at play time. Default flags
exist to change subtitle styling, but you can create your own GameplayTags to add per-project
options. Default flags defined on the project, the dialogue, or the subdialogue apply to every
line that does not carry the
NoDefaultflag.
Dynamic tag identification
Unique GameplayTags are created automatically to identify each Dialogue, Subdialogue, Choice and Reply:
Libretto.Dialogues.DialogueName[.SubdialogueName]
Libretto.Dialogues.DialogueName.Choice_ID[.Reply_ID]
By default they are generated when the project loads, by the LBRDynamicTagsSubsystem. You can
disable it via its bUseSubsystem value in the .ini; when disabled, the tags are baked to
Config/DynamicTags/DynamicTags.ini (and the tag→dialogue index to Config/LBRDynamicTags.ini)
instead. See Dynamic tags for details.
These tags are used to store metadata (how many times a dialogue/subdialogue was played, how many times a choice was selected) in the GPVar subsystem.
Sequences
The editor automatically detects the subdivisions a dialogue needs to run correctly. Lines are grouped into sequences, used during generation and playback in Sequencer — each sequence maps to one generated Sequencer asset. Selecting a line slightly brightens the other lines in the same sequence.
A line starts a new sequence when it is:
- the first line of a subdialogue,
- a
Cinematic,Reply,ElseIforElse, - right after a
ChoiceorIf/ElseIf/Else, - the destination of at least one GoTo.
A line ends a sequence when it is:
- the last line of a subdialogue,
- a
Cinematic,GoToorChoice.
Main view
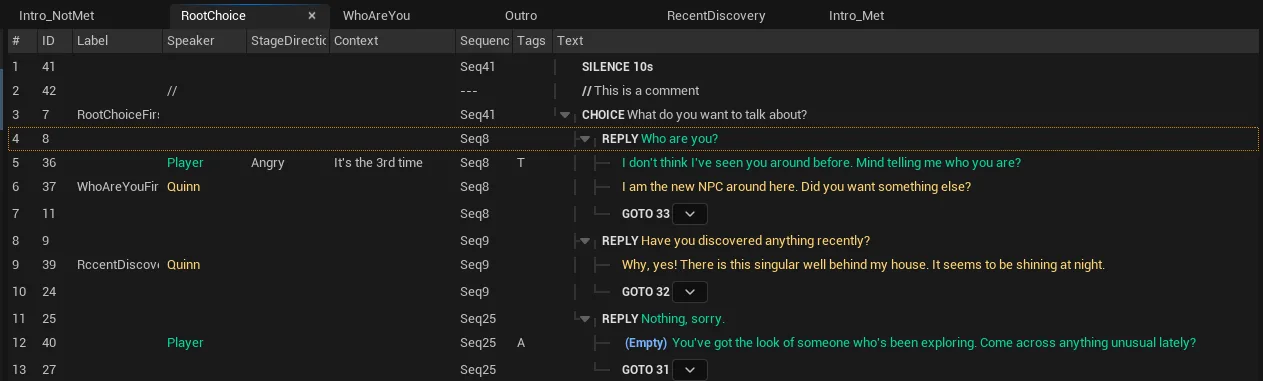
The View menu toggles the columns of the main view. A few notable ones:
- Index — rarely needed while writing, but useful for debugging: the index at which the line is stored in the Dialogue asset's data arrays. Updated when the Dialogue is saved.
- Sequence — which sequence the line belongs to.
- Tags — a visual aid to quickly spot lines carrying metadata such as conditions or actions.
Find panel
Ctrl+F opens the find panel. It searches a substring across the whole dialogue (case-insensitive);
the small arrows step through matches. If you search a number, pressing Enter (or Go to ID)
selects the matching ID directly, while the arrows search for that number inside the text.

Text preview panel
The Text Preview panel renders rich-text tags. You can change the rich-text configuration in Project Settings ▸ Libretto – Dialogue Editor.
Context menu
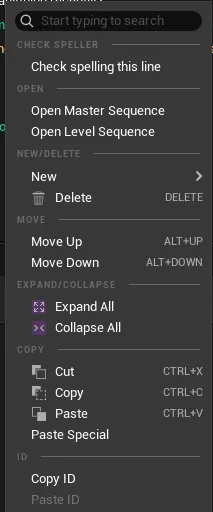
Right-click the main view for the context menu, split into sections:
- Spell Checker — see Spell checking.
- Open — open the Master or Level sequence in Sequencer at the right frame (you must generate the dialogue first).
- New / Delete — add new lines (also in the top toolbar) and delete.
- Move — move one or more lines up/down (also via drag & drop).
- Expand / Collapse — expand/collapse all lines at once.
Shift+left-click a line's arrow to expand/collapse its children. - Copy — Copy/Cut/Paste. Paste special opens a small window where you choose what comes along with the copied lines: their translations in every language, recorded voice, text-to-speech and lip-sync assets. The pasted lines get new IDs, and it works across dialogues (copy in one, paste special in another).
- ID — copy the selected line's ID (paste it directly into a GoTo).
Spell checking
The editor uses the spell checker built into Windows (the one Word and Edge rely on). You give it words; it returns the ones it does not know, with close spelling suggestions.
The spell checker can run as you edit a line, or on demand. On a "mistake", the line turns red and the
context menu lists the errors with replacement suggestions. If a word is not actually a mistake
(a proper noun, an acronym…), you can add it to a per-project dictionary at
Resources/Libretto/personalDictionary.dic.
Run it across the whole dialogue from Dialogue Tools ▸ Launch CheckSpeller.
There is nothing to install and no dictionary ships with the plugin: the checker uses the languages
installed in Windows. A two-letter culture picks the language's main region (en → en-US,
fr → fr-FR). To support another language, add it in Windows Settings ▸ Time & language ▸
Language & region, then restart the editor.

Automatic format rules
When a line is edited, regex-based rules can fix very specific mistakes — for example enforcing language-specific spacing around punctuation that inattention often breaks. Configure them in the Project Settings.
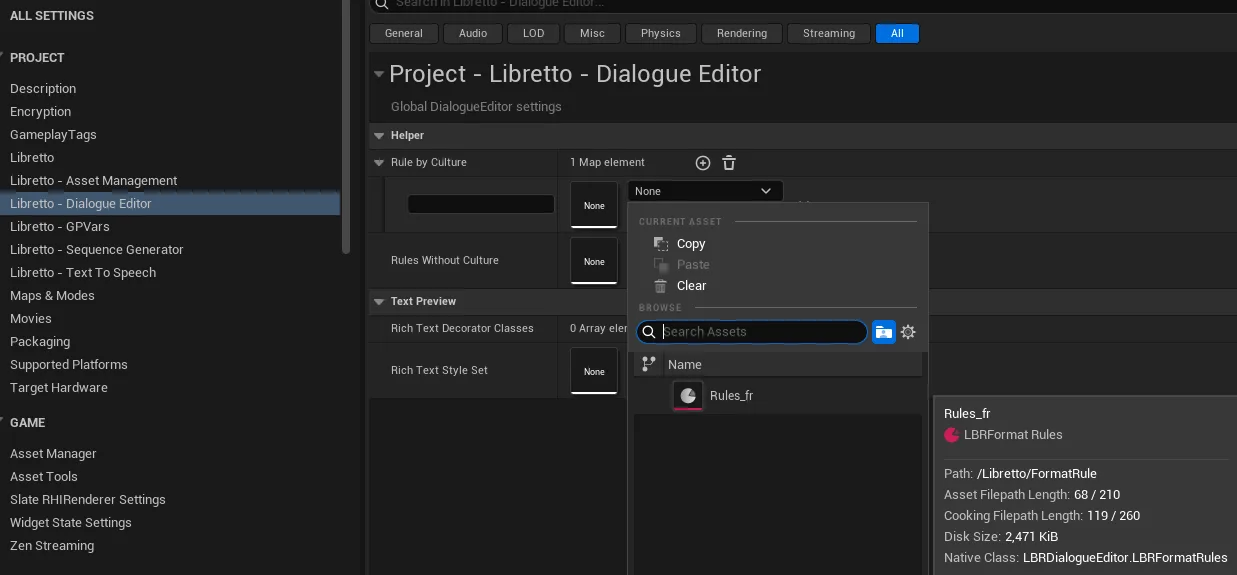
To add rules for a language, add an entry to Rule by Culture with that language and a rule set:
- A rule set is a Data Asset deriving from
ULBRFormatRules(with the "s"), holding rules in itsRulesarray. - A rule is a Data Asset deriving from
ULBRFormatRule, defined by three parameters:- Pattern — a regular expression matching the text to fix.
- Index to Fix in Pattern — the offset, from the start of the matched text, to fix.
- Fix Function Name — the fixing function. Currently
UpperCase,RemoveSpace,InsertSpace(defined in C++ inULBRFormatRule).
Example
Rule UpperCaseAtBeginning on the sentence "les jeux, c'est amusant." — the pattern matches
the first lowercase word "les", the index points at the first character "l", and UpperCase
turns it into "L" → "Les jeux, c'est amusant."
A per-line Enable automatic capital option lets you disable the capitalize-at-start rule.
Localization & import/export
Translating dialogues, importing and exporting dialogues via CSV, and tracking each line's localization/audio status are covered on their own page — see Localization & import/export.
Settings
In Project Settings ▸ Libretto:
- Dialogues Directory must list every Dialogue in the shipping game (a root directory; dialogues may live in sub-folders).
- Base Culture should be set (defaults to
en). - Extenders extend the properties attached to lines, subdialogues or dialogues, adding metadata editable in the details panels. Point them at a Blueprint class holding the variables to add. ⚠️ To apply an Extender change, close and reopen any open Dialogues.
- You can add default flags for all subdialogues or lines, and per-project flags at line, subdialogue or dialogue level, by creating the matching GameplayTags in the right hierarchy.
In Editor Preferences ▸ Libretto – Dialogue Editor you can change the automatic behaviour of the spell checker and auto-editing, and customize colors. Searching "Dialogue Editor" in Editor Preferences also lets you customize each command's shortcut.
Actions from the Content Browser
Right-click one or more Dialogues for several authoring batch tools:
- Find text — search text across the selected dialogues and open one at the match (a bulk
Ctrl+F). - Count — word-count statistics, copied to the clipboard as CSV.
Import / export actions moved
The CSV import/export actions (dialogue import, localization export, Choices And Replies, Fix localization) live on the Localization & import/export page.