Getting started
What do I need before I can write a dialogue?
A character Blueprint that Libretto recognises. A dialogue attributes each line to a character,
so before writing anything you need at least one character your project can speak as. Making a
character usable takes one step: implement the LBRDialogueCharacter interface on its Blueprint.
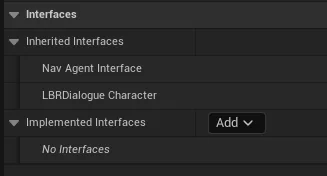
- Pick or create the character Blueprint that will act the scene — usually the pawn/character your game already uses.
- Implement the interface. Either derive the Blueprint from the shipped
ALBRSimpleDialogueCharacterbase (it already implements the interface and gives you aCharacterName), or addLBRDialogueCharacterto an existing class via Class Settings ▸ Implemented Interfaces. - Give it a display name (optional but recommended) by overriding
LBRGetCharacterName— prefer localized text, since the name can show up in subtitles. - Repeat for every character taking part. One Blueprint per character is the simplest setup.
Gotcha
Most projects implement the interface once, on a shared base class, then make one Blueprint
per character from it — you do not re-do this per character. For voices with no body in the
level (a phone call, a narrator), derive from ULBRIntangibleCharacter instead: it only
needs voice parameters and requires no actor in the scene.
See also: Characters · Intangible characters
I just want two characters to talk — where do I start?
Create a Dialogue asset, add the two characters, write the exchange, drop a Dialogue Instance in your level and generate from it, then play it. You do not need a stage, cameras or a cinematic: with no stage the scene plays in 3C mode and keeps the game's normal camera, driving the animation, audio and subtitles of the characters already in your level.
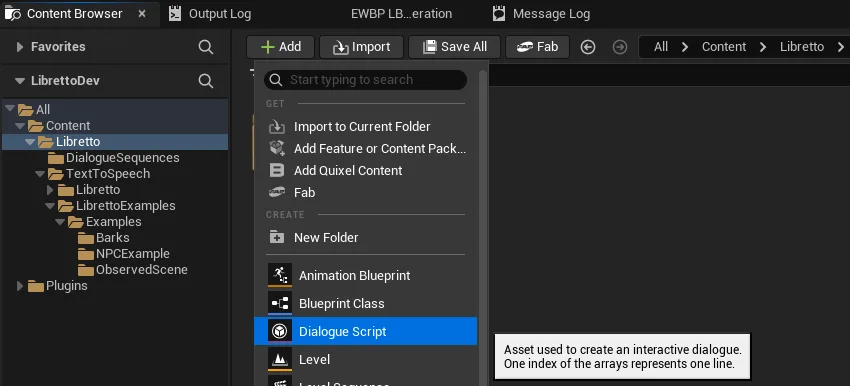
- Create the Dialogue. Right-click in the Content Browser ▸ Dialogue, name it
D_MyScene, and open it in the Dialogue Editor. - Add the two characters taking part. Use the yellow toolbar buttons in the Dialogue Editor to
add each character Blueprint — these must implement the
LBRDialogueCharacterinterface (see What do I need before I can write a dialogue?). They are the same Blueprints whose actors live in your level. - Write the exchange. Add a first Text line and set its Speaker and Listener. Then
let the editor write the back-and-forth for you:
Shift+Enter— new line with Speaker and Listener switched (the other character answers).Ctrl+Enter— new line with the same Speaker and Listener (the same character keeps talking).
- Place a Dialogue Instance. The quickest way: drag the
D_MySceneasset from the Content Browser straight into the level — this spawns anALBRDialogueInstanceactor with its Input Dialogue already set to that dialogue. (You can also place an emptyALBRDialogueInstanceand set Input Dialogue by hand.) Make sure the level also contains the two character actors. - Generate. With the Instance selected, use the buttons in its Details panel (General category), in this order: if you want spoken audio, press Generate Assets first to produce the TTS (see Voices), then press Generate Sequences. Each opens a wizard with every subdialogue already checked; press Run.
- Play it. Press Preview to see it immediately (next entry), or call
StartDialogueInstancefrom your game to trigger it for real (see Make it play in my game).
Gotcha
The generator staffs the scene from the actors already in the level: for each character it
takes the first actor of the matching class it finds (FindCharacterByClass). With a
single instance of each character class this just works. If several actors share a class,
the automatic pick may not be the one you want — you then have to disambiguate them explicitly
(see Characters). And nothing plays on its own — a
dropped Instance does not auto-play; you trigger it (step 6).
See also: Dialogue Editor · Generation overview · Runtime · Core concepts
How do I test it without wiring up any gameplay?
Select the Dialogue Instance and press Preview in its Details panel. It launches Play-In-Editor with the dialogue's tags pre-set and plays it straight away — no interaction, trigger or game logic needed.

- Select the Dialogue Instance in the level.
- In its Details panel (General category), press Preview.
- A short options wizard opens; press Run. PIE starts and the dialogue plays.
Gotcha
Preview plays what has been generated, not what you just typed — regenerate before previewing again. If you changed spoken text, run Generate Assets first, then Generate Sequences; if you only changed staging or cameras, Generate Sequences alone is enough. By default Auto End Play closes the PIE session when the dialogue finishes; turn it off in the wizard if you want to keep playing afterwards.
See also: Generation overview · Runtime
How do I actually make it play in my game?
Call StartDialogueInstance on the Dialogue Instance from Blueprint or C++, at the moment your
game should start the conversation (an interaction, a trigger volume, a quest step…). A generated
Instance never plays by itself.
- Get a reference to the Dialogue Instance actor (place it in the level, or spawn it).
- Call
StartDialogueInstancewhen you want the dialogue to begin. - Bind the end-of-dialogue callbacks if you need to react when it finishes.
No instance in the level?
For voice-only or ad-hoc dialogues that do not need a placed actor (a phone call, a narrator),
generate the dialogue as generic (right-click the asset ▸ Libretto ▸ Generate
Sequences…) and start it at runtime with the static StartGenericDialogue* helpers —
they spawn a transient instance for you.
See also: Runtime · Blueprint API · Priorities