Perspective & control
I want the player to keep some control while an NPC talks to them
Placing the NPCs and freeing the player are two independent choices — you can mix them. Whether the characters stand on fixed marks depends on whether the subdialogue has a stage; whether the player can still move and look depends on whether the gameplay camera keeps running and on the stage's two lock flags. So "positioned NPCs" does not force "player frozen" — you tune each side separately.
-
No positioning, full freedom — leave the Stage Actor Class empty. The subdialogue runs in plain 3C: nothing is placed, nothing is locked, the player keeps the gameplay camera and moves freely. You can make this explicit with the
Libretto.Flags.Subdialogue.Staging.3Cflag (TAG_LBRSubDialogueFlag_3C).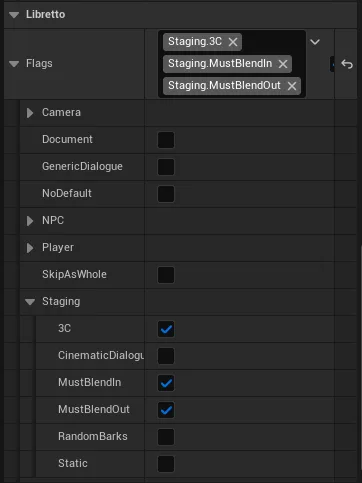
-
Positioned NPCs, player keeps the view — give the subdialogue a stage but set its
bUseStageCameras = false(the "3C-staged" mode): the NPCs snap to their marks while the game's own camera keeps running, so the player is never yanked into a cinematic view.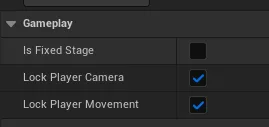
-
Tune movement and look separately — on the stage,
bLockPlayerMovementandbLockPlayerCameraare two independent booleans (both defaulttrue). Turn off whichever you want: let the player look around but not walk off, freeze the camera but allow a step back, or clear both for full freedom while the NPCs are still staged. - Generate Sequences. The scene plays with whatever mix of placement and freedom you set.
Gotcha
The lock flags live on the stage, so a no-stage 3C subdialogue has nothing to lock — the
player is always free there. But the reverse trap: a stage locks the player by default
(both flags true), so simply adding a stage to position your NPCs will freeze the player
until you turn the flags off. Placement and locking are separate settings, but the defaults tie
them together — flip them deliberately.
See also: Staging — add a stage · Runtime — staging modes
I want a cinematic that takes over the view and player control
Choose the staging mode on the subdialogue — the three modes decide who drives the camera and whether the player is locked. Every subdialogue plays in one of three modes, and picking one is how you slide from "fully in the player's hands" to "fully authored cutscene".
- Staged (cinematic take-over) — give the subdialogue a Stage Actor Class. The stage's
cameras drive the view and, by default, the player's movement and camera are locked
(
bLockPlayerMovement/bLockPlayerCameraon the stage). This is the mode for a directed, filmed scene. -
3C-staged (placed, but player keeps the view) — use a stage but set its
bUseStageCameras = false: characters snap to their marks, yet the gameplay camera keeps running. See the previous entry for the movement/look freedom knobs.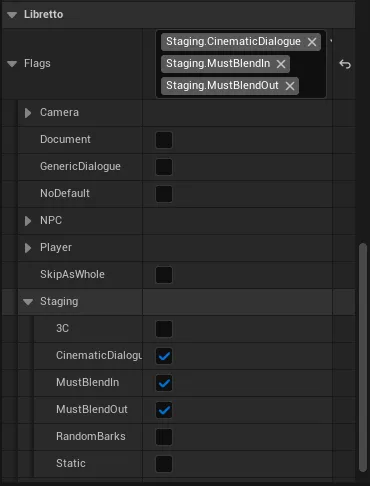
-
Cinematic (hand-authored) — tick the subdialogue's
Libretto.Flags.Subdialogue.Staging.CinematicDialogueflag (TAG_LBRSubDialogueFlag_CinematicDialogue). Libretto generates no cameras and no character animation — only the timeline shell — leaving the shot to be built by hand in Sequencer.
Gotcha
Staged and Cinematic are different things: staged still generates cameras and animation for you; cinematic deliberately generates neither and is meant to be reworked by a cinematic designer. Don't reach for the Cinematic flag just to get a filmed look — a normal stage is what films the scene automatically.
See also: Staging — add a stage · Runtime — staging modes · Core concepts
How do I make my own character (or player) able to talk in dialogues?
Implement the LBRDialogueCharacter interface on your Actor — you don't need to derive from
anything. Libretto talks to participants through the ILBRDialogueCharacter interface, which is
Blueprintable: any pawn, character or object that implements it can be cast in a dialogue. The
plugin's ALBRSimpleDialogueCharacter and ULBRIntangibleCharacter are just ready-made
implementations — use them as-is, or add the interface to your own class instead of subclassing them.
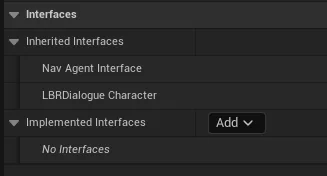
- On your Blueprint (or C++ class), add the
LBRDialogueCharacterinterface (Class Settings ▸ Implemented Interfaces). - Implement the identity functions:
LBRGetCharacterName(localized display name) andLBRGetCharacterGender(feeds the TTS voice fallback). - For a bodied character, return the meshes to animate:
LBRGetBodyComponent(body animation / gestures) andLBRGetHeadComponent(face / lip-sync). A voice-only character can leave these — that is exactly whatULBRIntangibleCharacterdoes. - Implement
RequestStartDialogue: get the character ready (move it into place if you handle that yourself) and then callULBRDialogueManager::OnDialogueCharacterReadyForDialogue— the dialogue waits for this call before starting. ImplementRequestEndDialogueto clean up. - To let the character stand on stage marks, return its roles from
GetStageRoles(Libretto.Stage.Roles.*) — the same role system slots, cameras and lights match against.
Gotcha
A dialogue will hang on start if a participant's RequestStartDialogue never calls
OnDialogueCharacterReadyForDialogue — that callback is the "I'm ready" signal, so it must fire
on every path (including the case where there is nothing to move). If you only need a
bodyless voice (a narrator, a voice on comms), don't reimplement the interface — use
ULBRIntangibleCharacter.
See also: Intangible characters · Staging — who stands where · Blueprint API