GPVars & Conditions
GPVars (gameplay variables) let programmers and designers store game state on the GameInstance and read or write it reliably from anywhere — C++ or Blueprint. Because they live on the GameInstance, a GPVar survives level travel and is reachable without holding a reference to whatever object created it.
A GPVar is a small, addressable piece of state: a boolean, an integer, or a "how many times" counter. Each one is identified by a path (see GPTagPath), which keeps the whole store tidy and browsable in the runtime debug widget.
The GPVar system is also what the Dialogue system uses under the hood to remember what the player has done — which dialogues were played, which choices were picked — and to drive condition-based branching.
In a nutshell
A GPTagPath names a variable. A GPFlag is a boolean, a GPCounter is an integer, and a
CountedGPFlag is a flag that survives being set from several places at once. The
ULBRGPVarSubsystem owns the whole store; listeners and delegates notify you when a
value changes; a debug widget lets you inspect and edit everything live.
A worked example
Imagine a Karma value that is specific to each character. You create one GameplayTag,
Stats.Karma, and store the value per character by combining it with a character path:
Characters.Player / Stats.Karma— the player's karmaCharacters.NPC1 / Stats.Karma— NPC1's karma
From there, every discipline reads and writes the same variable through the same path:
- a narrative designer adds
+3when a dialogue choice consoles a character; - a quest designer gates a shrine behind "karma ≥ 15";
- a game designer subtracts
2for an unsavoury action; - a sound designer triggers an effect when karma goes negative;
- a programmer feeds "karma ≥ 25" to an Animation Blueprint to pick a walk cycle;
- a QA tester edits karma directly in the debug widget to check all of the above at once.
GameplayTags
GPVars are built on GameplayTags, a native Unreal feature: text identifiers registered in a list under Project Settings ▸ GameplayTags. You pick a tag from a combo box rather than typing a string, which avoids typos and makes renames safe.
Warning
When you add a Gameplay Tag through the Project Settings, remember to commit the resulting
Config/DefaultGameplayTags.ini.
GPTagPath
A GPTagPath (short for "gameplay tag path") is a path, much like a file path on disk. Instead of folders and a filename, it is a sequence of GameplayTags, for example:
Characters.Galeb / Inventory.SC01.JaraReport
Every GPVar is identified by a GPTagPath. That is what lets the debug widget lay them out as a tidy tree — "Galeb owns the JaraReport item" is filed under the Galeb character branch.
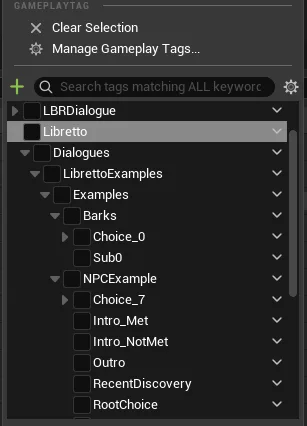
You compose a GPTagPath the same way you pick a GameplayTag: by selecting several tags in sequence. The picker shows the path being built at the top, with each part labelled by its position in the path.
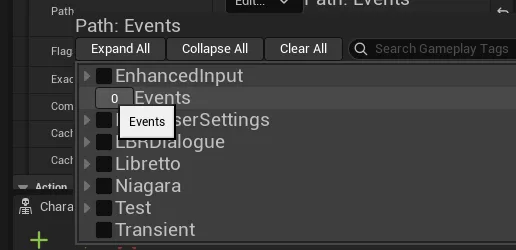
Utility functions live under Gameplay Tag ▸ Utils ▸ GPTagPath.
Single path vs. grouped flags
Most functions take one GPTagPath to identify one GPVar. Functions that operate on several flags
at once (the ones with Flags, plural, in the name — e.g. RaiseGPFlags) instead take the
shared parent path and a container of the leaf flags to change together.
GPVar types
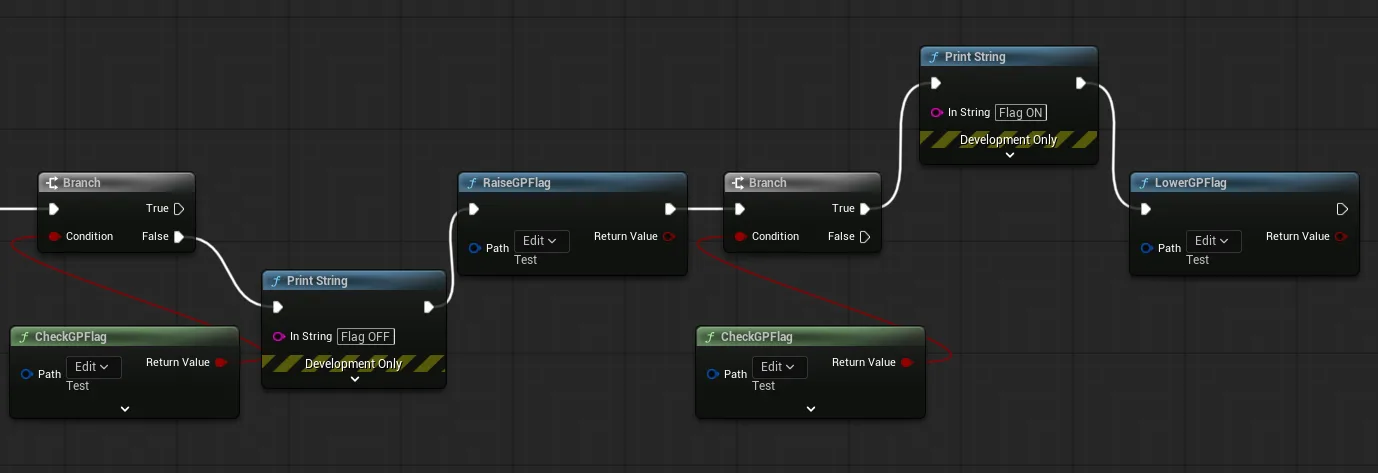
GPFlag 🏳️
A GPFlag is a boolean.
| Action | Node |
|---|---|
Set to true |
RaiseGPFlag |
Set to false |
LowerGPFlag |
| Read | CheckGPFlag |
GPCounter 🔢
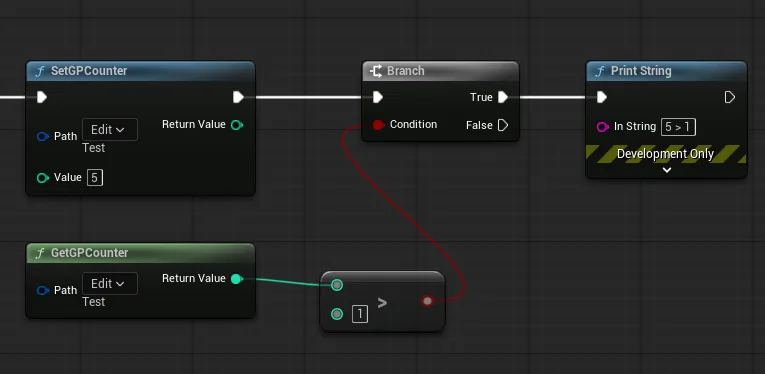
A GPCounter is a whole (non-decimal) integer.
| Action | Node |
|---|---|
| Set the value | SetGPCounter |
| Read the value | GetGPCounter |
CountedGPFlag 🎌
A CountedGPFlag behaves almost like a GPFlag, but it tolerates being raised from several places
without clobbering the others. If you raise the same CountedGPFlag n times, checking it
returns true until it has been lowered the same n times.
The Blueprint-callable nodes are RaiseCountedGPFlag, LowerCountedGPFlag and ClearCountedGPFlag (plus a check).
Info
Internally there is no separate "CountedGPFlag" storage. It is the combination of a GPFlag and
a GPCounter filed at the same GPTagPath — mirrored by the fields of FGPVarNode, which
holds both a GPFlags container and a GPCounters map. Don't poke at those two halves by hand if
you're using them as a CountedGPFlag, or you'll desynchronise the count.
Nodes 🪢
Nodes are the folders of this system: they are generated automatically when a GPVar is created and
exist purely to organise the tree. A node is not a GPVar. For example, in
Characters.Emem / Gameplay.Attributes.Mental the counter is the GPVar, while Characters.Emem is
just a storage node.
Default values
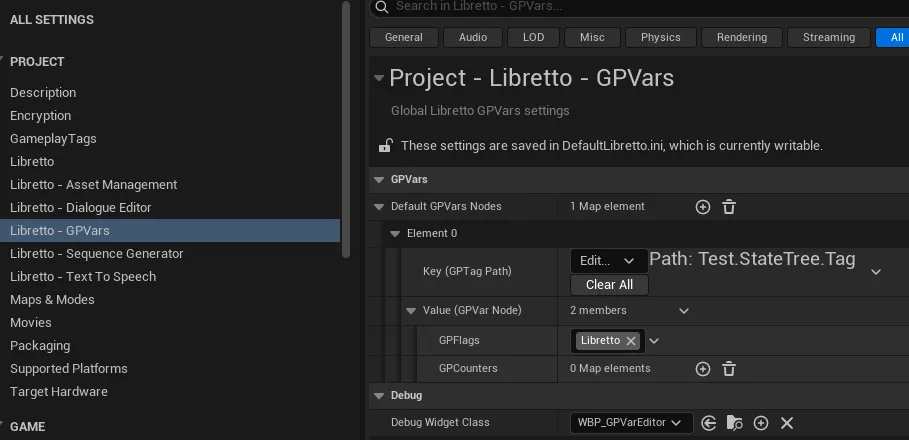
You can define GPFlags and GPCounters that are set automatically the first time the game runs and on every PIE launch.
- Project-wide defaults: Project Settings ▸ Libretto - GPVars ▸ Default GPVarsNodes
(backed by
ULBRGPVarSettings, saved to theLibrettoconfig). - Per-machine defaults, just for you: Editor Preferences ▸ Libretto - GPVars ▸
Default GPVarsNodes (backed by
ULBRGPVarLocalSettings).
Each entry is a FGPTagPath → FGPVarNode pair: the key is the parent path (it may be empty if
the whole path is a single tag), and the value lists the GPFlags to raise and the GPCounters
to seed.
The store: ULBRGPVarSubsystem
The whole game's GPVar store is owned by the ULBRGPVarSubsystem (module LBRTags),
reachable from both C++ and Blueprint. All of the nodes above are thin wrappers over its
Static_* methods, so you never need a reference to the subsystem to call them.
Saving
The store is not saved for you. It is an engine subsystem, so it survives level travel, but it starts empty with every game session (and, in the editor, with every PIE session).
To save it, serialize the subsystem (ULBRGPVarSubsystem::GetGPVarSubsystem()) with a SaveGame
archive (ArIsSaveGame = true) into your own save data, and read it back the same way. Its GPVar
nodes are SaveGame properties. GPVars under the Transient root tag are removed when a save is
loaded: put there what must never outlive the session.
Save the condition history (ULBRConditionHistorySubsystem) in the same save: the GPVars and the
cached condition results go together. The full recipe, with the code, is in the FAQ:
I want to save and restore Libretto state with my save game.
Reacting to changes
You often want to run a check once, right after a value changes, rather than polling it every frame. Two mechanisms let you hook in immediately after a GPVar is modified.
Listeners 👂
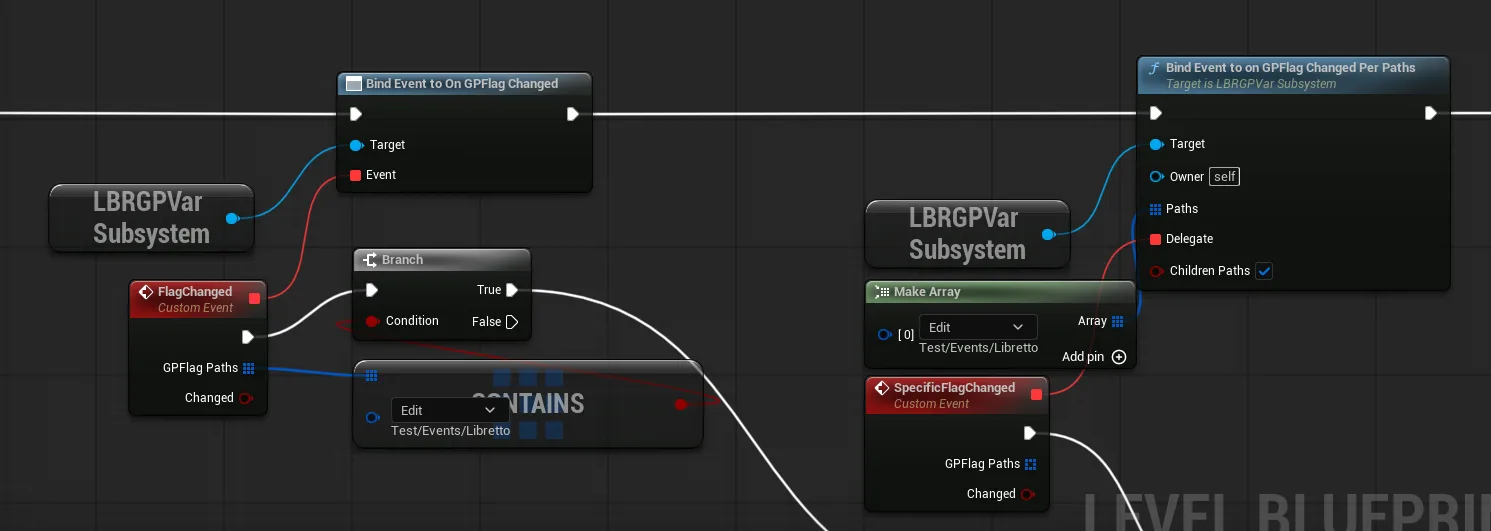
A listener is an object that filters the GPVars you care about and fires an event on each change.
The plugin ships the native base classes UGPFlagListener and UGPCounterListener; a project
typically wraps them in listener actors you drop into a level, give a GPTagPath, and wire up in
the Level Blueprint:
- OnFlagChanged
GPFlagPaths— all flags changed in the same batch.Changed—trueif the flag was raised,falseif lowered.
- OnCounterChanged
GPCounterPath— the counter that changed.PreviousValue/NewValue— the values before and after.
Tip
You are not limited to one path per actor. Listeners can watch several variables at once, or work without any actor at all — take the shipped listeners as a template, or ask a programmer.
Delegates 🗳️
You can also bind directly to the subsystem's delegates — e.g.
BindEventToOnGPFlagChangedPerPaths / BindEventToOnGPCounterChangedPerPaths (and their Unbind
counterparts). This is lower-level: you own registering and unregistering, and you filter the
paths yourself. The parameters mirror the listener events above.
The runtime debug widget
A debug widget (the GPVarEditor) displays the live state of the store: which flags are raised and what every counter reads, with the ability to add, remove and edit GPVars while the game runs. It is invaluable for testing:
- a narrative designer tweaks a character's stats to reach a specific dialogue option;
- a QA tester drops an item into an inventory to check its use;
- a programmer flips a state to confirm a power unlocks at the right moment.
Opening it
While playing (PIE or a packaged game), open the console and run:
Libretto.GPVar.OpenDebugWidget
Run it again to close it — the command toggles the widget. It shows the widget set in
Project Settings ▸ Libretto – GPVars ▸ Debug ▸ Debug Widget Class, which defaults to the one
shipped with the plugin (WBP_GPVarEditor, under Content/GPVars/GPTagEditor/, backed by the
native UGPVarCreatorWidget / SGPVarCreator classes in module LBRTags). Point that setting at
your own widget to customise the inspector.
Bind it to a key
For frequent use, bind the same behaviour to a key in a Level or player Blueprint (create the widget and add it to the viewport) instead of typing the console command each time.
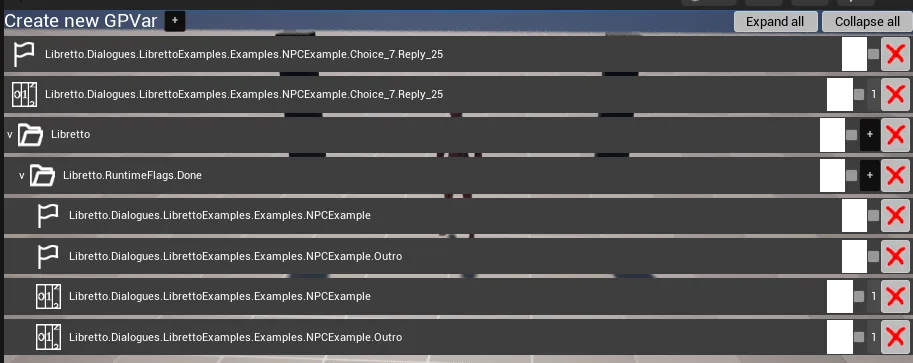
Layout
The widget has three parts:
- a control to add new GPVars ("Create new GPVar", with Expand all / Collapse all);
- the TreeView controls;
- the TreeView of the store itself.
Reading the tree
The hierarchy is built from the GPVars' GPTagPaths. The left symbol tells you the node state:
| Symbol | Meaning |
|---|---|
> |
collapsed, can be expanded |
v |
expanded |
- |
leaf node, contains no GPVar |
A raised GPFlag shows just its GameplayTag; a GPCounter additionally shows its value on the right, in an editable field.
Editing
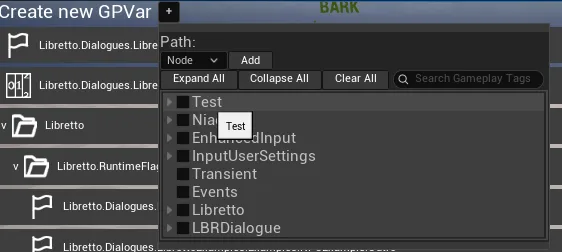
+at the top adds a GPVar to the root of the store.+on a node's row adds a GPVar inside that storage node.xon a row deletes that GPVar or node.
Pressing + opens the GPVarCreator popup, which shows the path being built, a type dropdown
(GPVar type, or Node for a plain storage node — plus a value field when creating a GPCounter), an
Add button, and the same GPTagPath picker used everywhere else.
How GPVars link to dialogues
The Dialogue system uses GPVars as its memory. Three things tie them together: auto-generated per-asset tags, runtime flags and counters written during play, and conditions on lines that read those values back.
Auto-generated dialogue tags
Rather than have you type strings, the Dialogue system generates a unique GameplayTag for each Dialogue, Subdialogue, Choice and Reply (see the Dialogue Editor's Dynamic tag identification):
Libretto.Dialogues.DialogueName[.SubdialogueName]
Libretto.Dialogues.DialogueName.Choice_ID[.Reply_ID]
These are produced by the LBRDialogueTagsSubsystem when the project loads (disable it via its
bUseSubsystem value in the .ini, in which case tags are written to
Config/Tags/Dialogues/….ini as a fallback). They let you track every choice a player makes and
drive subdialogue selection, all without hand-typed strings. The tooltip that identifies a
dialogue's subdialogue selectors is carried by the <dialogue>.SubdialogueSelectors sub-tag.
Runtime flags & counters written during play
As a dialogue plays, the system records progress in the GPVar store:
| What is recorded | How |
|---|---|
| A dialogue was played | A CountedGPFlag under the Done category (flag + counter) — the counter = how many times it has been played. Raised at the end of the dialogue. |
| A subdialogue was played | Same, keyed by the subdialogue's tag. Raised at the end of each subdialogue. |
| A reply was chosen | A CountedGPFlag written flat at the root (no category), keyed by the reply's tag — raised each time that reply is picked. |
Play a dialogue once, open the debug widget, and you'll see these entries appear on their own — exactly what you would have created by hand.
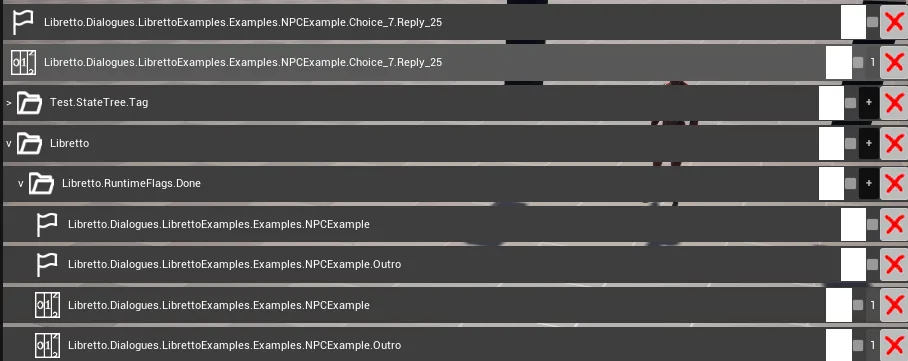
The Done tag layout
The Done tag path is built as Libretto.RuntimeFlags.Done + <dialogue-or-subdialogue tag>, so
Done is the parent category and the dialogue/subdialogue tag is the leaf flag+counter
(ULBRDialogue::Static_GetDialogueDoneGPTagPath, ULBRSubdialogue::GetSubdialogueDoneGPTagPath).
To test whether a dialogue is done, use the dedicated condition ULBRDialogueDoneCondition —
it takes dialogue / subdialogue tags directly (with a bCheckAll toggle for all vs any) and
knows this layout. There is also ULBRDialogueDoneCountedCondition (derived from
ULBRCheckGPCounter) to compare how many times a dialogue was played. Prefer these over
hand-rolled GPVar-path conditions.
The conditions dropdown
On a Reply, a Subdialogue, or an If/ElseIf/Else branch you can attach a condition that reads dynamic state — including the GPVars above. The condition dropdown offers logical combinators and a family of GPVar checks (module LBRConditions):
| Condition | What it checks |
|---|---|
None, AND, OR, XOR, NOT, FALSE, Empty |
Logical structure / combinators. |
Check All / Any / Not GPFlags |
Whether the given leaf flags are (all/any/none) raised within a shared path. |
Check All / Any / Not GPPaths |
The same test, but each entry is a full path given directly. |
Count GPFlags / Count GPPaths |
Count how many of the given flags/paths are raised and compare. |
Check GPCounter |
Compare a counter at a path against a value. |
Dialogue Done |
(2026) Were the given dialogues/subdialogues played? — the layout-aware replacement above. |
Dialogue Done Counted |
(2026) Compare how many times a dialogue/subdialogue was played. |
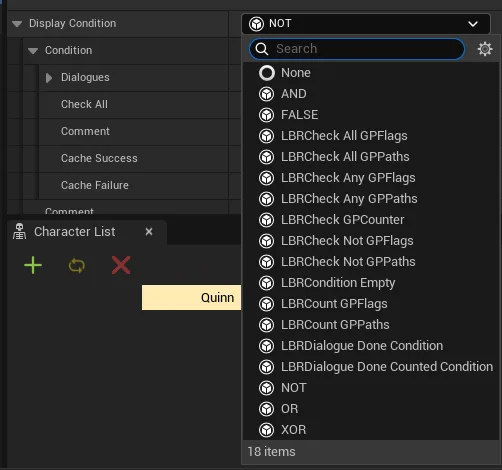
GPFlags vs. GPPaths
The two families do the same job with different ergonomics. GPFlags conditions take one
shared parent path plus a container of leaf tags — handy for testing several values under
the same path in one condition. GPPaths conditions take an array of complete paths — handy
when the things you test live in unrelated places. Both expose an Exact Match toggle (default
on) and, inherited from the base ULBRCondition, a free-text Comment plus Cache Success /
Cache Failure (a positive/negative result short-circuits further evaluation).
Display vs. Availability condition
A Reply exposes two condition slots, and the difference matters:
| Slot | Effect when the condition is false |
|---|---|
| Display Condition | The reply is not offered at all — neither shown nor selectable. |
| Availability Condition | The reply is shown, but greyed out and not selectable. |
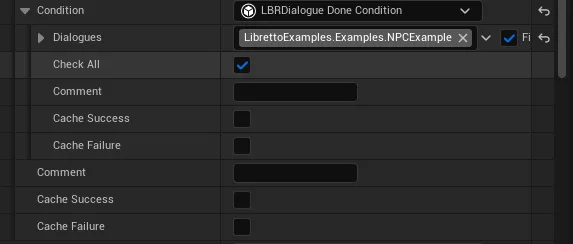
Gate a reply behind a first playthrough
Put a ULBRDialogueDoneCondition on a reply's Display Condition, targeting the current
dialogue's tag. On the first run the dialogue is not yet Done, so the reply is hidden; replay the
dialogue and — now that Done is raised — the reply appears.