Staging
I want my characters to stand in fixed spots and play it like a real scene — how do I add a stage?
Give the subdialogue a Stage Actor Class. With no stage a dialogue plays in 3C and keeps the game's normal camera; a stage places the characters on fixed marks and films them with its own cameras, turning the scene into a cinematic.
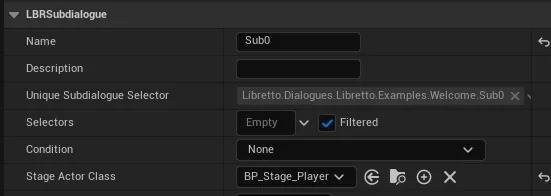
- In the Dialogue Editor, select the subdialogue and set its Stage Actor Class to a stage
Blueprint (a subclass of
ALBRDialogueStageActor). Libretto ships example stages, or you can build your own (see How do I create my own stage?). - Make sure the stage exists where the scene should play — either drop the stage actor in the level at the right spot, or let generation spawn it for you.
- Press Generate Sequences. The scene now uses the stage's marks and cameras instead of 3C.
Gotcha
A subdialogue with no Stage Actor Class stays in 3C (gameplay camera). A stage can also
place characters on its marks while keeping the gameplay view — that is the "3C staged" mode,
set with the stage's bUseStageCameras = false. By default a stage also locks the player's
camera and movement for the duration (bLockPlayerCamera / bLockPlayerMovement); turn those
off on the stage if the player should stay free.
See also: Core concepts — Stage · Dialogue Editor — subdialogues · Runtime
How do I control who stands where?
Each stage slot carries a Role, and characters are matched to slots by role. A slot is a mark on the stage; its role says who stands there — not which specific actor, so the same stage works for any cast.
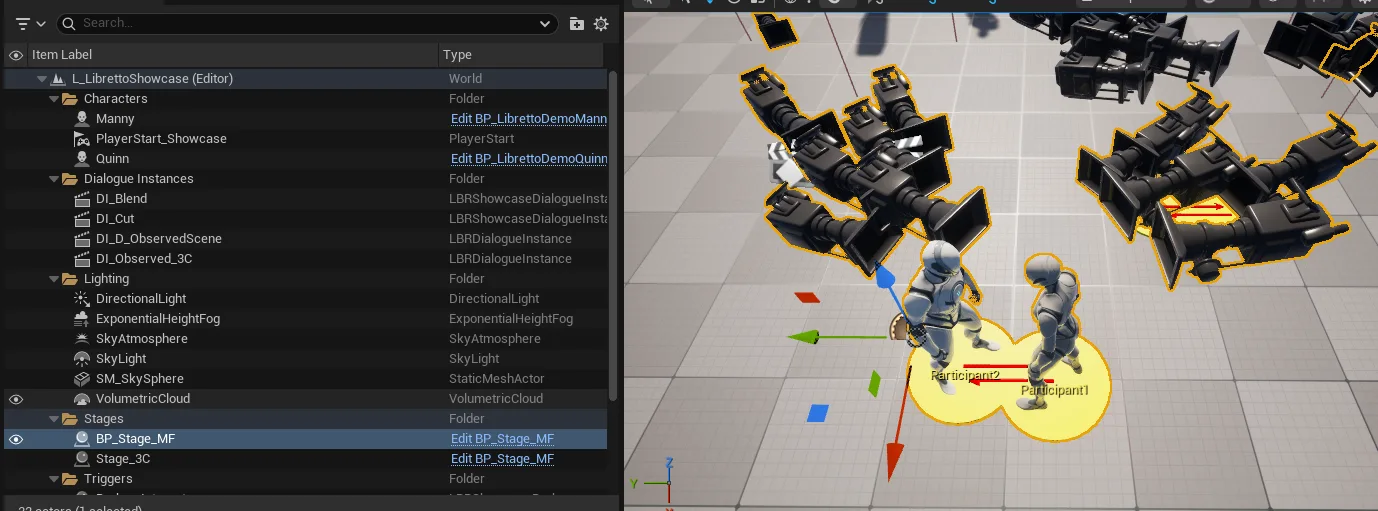
- A stage has one
ULBRStageSlotComponentper participant. Each slot's transform is the mark the character is placed on. -
Set each slot's
RoleTagto a value underLibretto.Stage.Roles.*— the built-inPlayer,Participant1,Participant2,Participant3, or a semantic role your project declares under the same root. Matching is by role, and the positional defaults (Participant1,2,3) work out of the box. 3. To pin a specific actor to a role, use the Dialogue Instance's Stage Characters Override
(the
3. To pin a specific actor to a role, use the Dialogue Instance's Stage Characters Override
(the RoleToCharactermap) — it takes priority over the automatic role matching.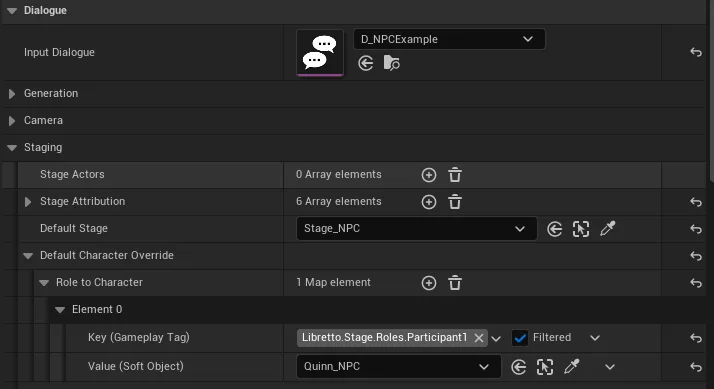 4. To see who stands where without playing, set each slot's
 PreviewMesh(and optionalPreviewPose) — a staging mannequin then shows in the viewport when the stage is selected and the Libretto Stage Previews show flag is on.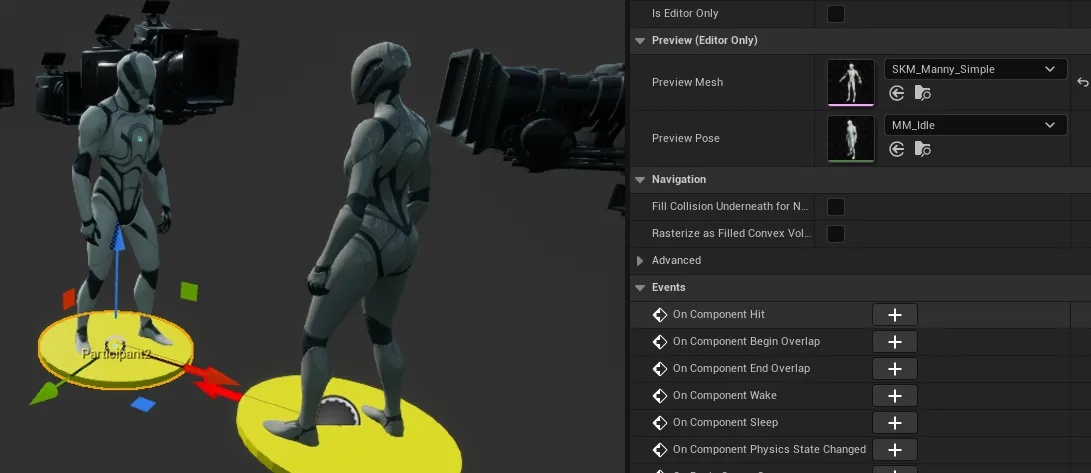
Gotcha
A slot's role is a stable participant identity — who occupies that mark for the whole scene. It is not a line's Speaker/Listener, which is volatile and only drives camera selection. Don't try to change who stands where by editing Speaker/Listener; change the slot roles (or the override) instead.
See also: Core concepts — Stage · Gameplay tag flags
I want the scene to play wherever the characters are, not at one fixed spot
Let the stage position itself around the characters — set its Anchor Mode. A stage doesn't have to be pre-placed in the level; at playback start it can move (and rotate) to fit where the participants already stand, so the same stage works anywhere the conversation is triggered.

- On the stage, set
AnchorMode:- Keep Placed (default) — the stage stays exactly where you put it in the level.
- Relative To Character — pin one slot onto a character (that character does not move) and
let the rest of the stage arrange itself around it. Set
AnchorRoleto the role whose slot is the pivot; the character filling that role is the anchor. - Specific Point — drop the stage onto a transform supplied at launch (or by an anchor actor).
- Slot Weighting — place the stage origin at the centre of all the participants' current positions.
- For Relative To Character or Slot Weighting, also enable
bOrientToParticipantsso the stage rotates (yaw, around the anchor slot) to face the participants where they already are — minimising how far anyone has to travel to their mark.
Gotcha
The default is Keep Placed: a stage placed in the level will not follow anyone unless you
change the mode. Repositioning happens once, at playback start, so pair it with Walk entry
transitions (above) if you want the characters to visibly move onto a stage that formed around
them, rather than snapping. A stage can also be found at runtime by identity via its StageId
(it registers itself when placed), so generated content can bind to whichever stage instance is
resolved on the spot.
See also: Runtime · Core concepts — Stage
I want different staging in different parts of the conversation
Set the stage per subdialogue. Staging is chosen on each subdialogue, so a single Dialogue can switch between different stages — or between staged and 3C — as it goes.
- Split the conversation into subdialogues (see Writing — split a long conversation).
- Give each subdialogue its own Stage Actor Class — or leave one with none to play that part in 3C.
Gotcha
The character list is shared across the whole Dialogue, but the staging is per subdialogue. The same two characters can play one section as a staged cinematic and the next in 3C, without redefining who is in the scene.
See also: Writing — subdialogues · Dialogue Editor — subdialogues
I want characters to walk into place instead of teleporting
Set the Entry/Exit transitions on the Dialogue Instance. How characters get on the stage at the start and off it at the end is a property of the placed Instance, not of the dialogue script — so the same dialogue can pop in one place and walk in another.
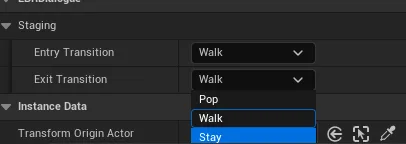
- On the Dialogue Instance, open Staging ▸ Transitions.
- Set Entry Transition: Pop (teleport straight to the mark), Walk (walk to the mark), or Stay (don't bring them — they play where they already are).
- Set Exit Transition: Pop (teleport back to where they started), Walk (walk back), or Stay (remain on the stage at the end).
Gotcha
Defaults are Entry = Pop and Exit = Stay (the historical behaviour). Walk only works
for characters that support scripted movement — the generic walk is carried by
ALBRSimpleDialogueCharacter; a custom character that doesn't implement it falls back to a
pop. Because these live on the Instance, they are a presentation choice, not something you
author once in the dialogue.
See also: Runtime · Core concepts — Stage
How do I create my own stage?
Make a Blueprint subclass of ALBRDialogueStageActor, add a slot per participant and at least one
camera, then set it as a subdialogue's Stage Actor Class. A stage is just an actor that carries
marks (slots) and cameras — everything else (character matching, teleport/walk, camera cutting) is
handled for you.
- Create the stage Blueprint. New Blueprint ▸ parent class
ALBRDialogueStageActor. - Add the marks. Add one
ULBRStageSlotComponentper participant, position each where a character should stand, and set itsRoleTag(Player,Participant1,Participant2, …). Optionally setPreviewMesh/PreviewPoseso you can see the layout in the editor. -
Add the cameras. Add one or more
ULBRStageCameraComponent, place and aim each, then set itsShotType(close-up, medium, OTS…) and itsFocusedRoles— the role(s) it frames. For a shot not tied to a participant, use a framing tag instead (Libretto.Stage.Framing.Wide/Group). Mark any camera meant for player choices withbIsChoiceCam.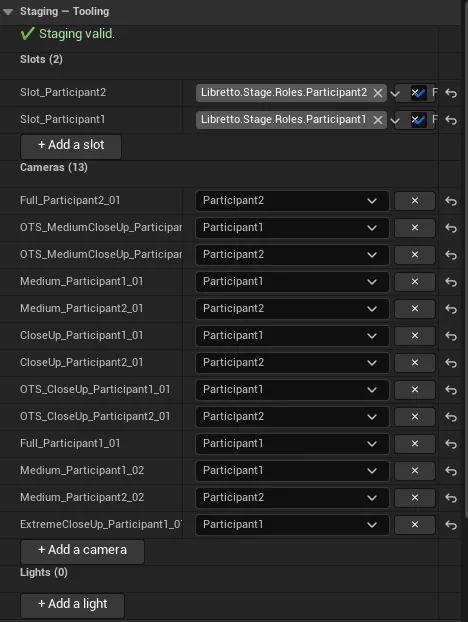 4. Add lights (optional). Add one or more
 ULBRStageLightComponent(a point light) to light the scene the way the cameras frame it. Set each light'sLitRoleto the role it lights (Libretto.Stage.Roles.*) — so it tracks whichever character fills that role — or to a framing tag (Libretto.Stage.Framing.*) for overall lighting not tied to one participant. Lights use the same role system as slots and cameras, so they move with the cast.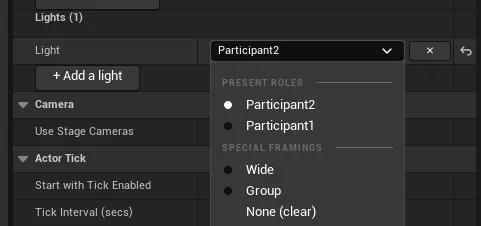 5. Tune the presentation (optional). On the stage itself:
 bUseStageCameras(turn off to place characters but keep the gameplay view — "3C staged"),bLockPlayerCamera/bLockPlayerMovement, andCameraRulesStageOverrideto override the camera rules for this stage only. 6. Use it. Set this Blueprint as a subdialogue's Stage Actor Class and Generate Sequences.
Gotcha
A stage needs at least one valid camera or it can't drive the view (a camera whose cut track ends up empty pops the view back to the gameplay camera). Remember that cameras — and lights — target roles, not specific characters — that is exactly what lets one stage serve any cast. Lights are optional: with none, the scene simply uses your level's existing lighting. Fine camera behaviour (shot selection, rules, in-editor piloting) is covered in Cameras.
See also: Camera rules · Cameras · Core concepts — Stage