Writing dialogue
The player should pick their answers — how do I branch the conversation?
Add a Choice line, then put Reply lines under it. Each Reply is one option the player can
pick; whatever you write under a Reply is the branch that plays when it is chosen. When the branch
finishes, reading resumes at the line immediately after the Choice.
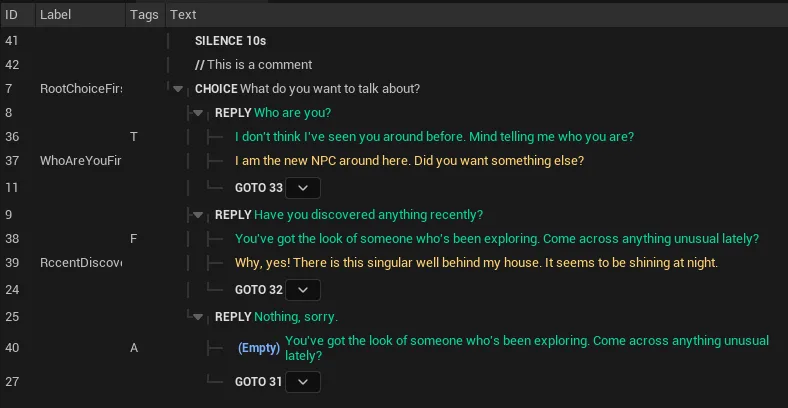
- Add a Choice line where the player should decide. Set its Time (seconds allowed to
choose;
0= no time limit). - Add a Reply line under it for each option, and write its branch (Text lines, GoTo, more
Choices…) indented beneath it. The Reply's own text is used to display the option to the
player; it is not voiced. To voice a player choice, put a
Textline spoken by the player character inside the Choice or after it. - To send a branch somewhere other than the line after the Choice, end it with a GoTo (to a line ID/Label, or Next Subdialogue).
- Fine-tune each Reply in the details panel: Do Once (once picked, it can no longer be chosen again), Default Reply (picked if the timer runs out), Display Condition (hide it entirely when false), Availability Condition (show it greyed-out and unselectable when false).
Gotcha
After a Reply block ends, the next line played is the one immediately after the Choice, at the
same indentation — plan a line for the branches to reconverge on, or use GoTo to route
elsewhere.
See also: Dialogue Editor — line types · Choice widgets · Conditions
How do I split a long conversation, or change it depending on context?
Split it into subdialogues. A subdialogue is a self-contained branch of the same Dialogue that you can request by name and gate with a condition — the natural way to hold different conversations between the same characters (before/after a reveal, one-on-one vs. a third character joining) or just to keep a long script readable.
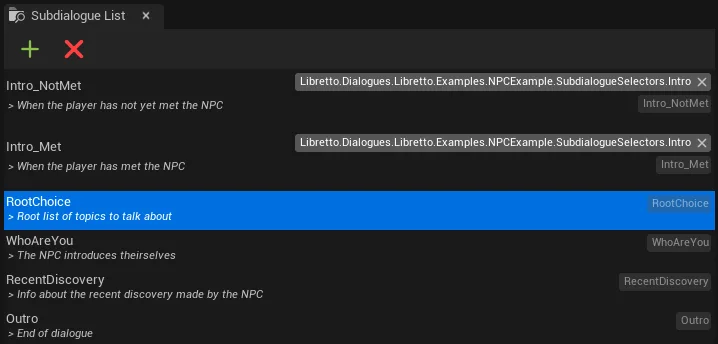
- Add a subdialogue and give it a unique Name.
- Optionally set its Selectors (tags to pick or group it) and its Condition (whether it may play at all).
- Request a specific subdialogue by name at runtime; on entry, candidates are evaluated in list order and the first one whose name matches and whose condition passes is played.
- To chain subdialogues, end one with a GoTo ▸ Next Subdialogue (or a GoTo to a specific line).
Gotcha
The end of a subdialogue is the end of the whole Dialogue unless you jump out with an
explicit GoTo — and the order of subdialogues in the list matters, because Next
Subdialogue uses it. The character list is shared across the whole Dialogue, but each
subdialogue can redefine its own staging (see Stages).
See also: Dialogue Editor — subdialogues · Conditions · Priorities
How do I make a line appear only in certain situations?
Attach a condition. Conditions are small Blueprints that read dynamic game state and return true/false; you can put one on a Reply, on an If/ElseIf/Else branch, or on a whole subdialogue.
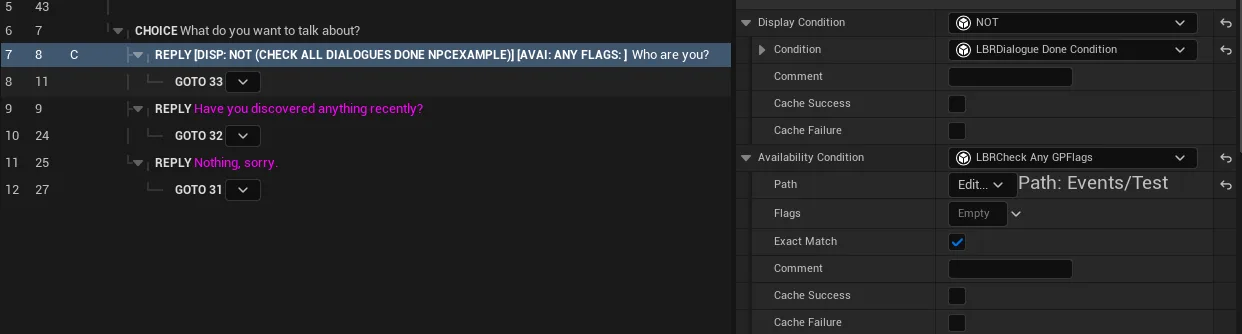
- For a player option, use the Reply's Display Condition (hidden when false) or Availability Condition (shown but greyed-out when false).
- To branch without player input, use an If / ElseIf / Else block and set the branch's Success Condition — the first branch whose condition is true is entered.
- To enable/disable an entire subdialogue, set its Condition.
Gotcha
To test "has this dialogue or subdialogue already been played", use the dedicated
ULBRDialogueDoneCondition rather than hand-writing a GPVar-path check — Libretto already
records play counts against each dialogue's dynamic tag.
See also: Conditions · GPVars · Dialogue Editor — conditions
How do I run game logic when a line plays?
Attach an action to the line. An action is a Blueprint (ULBRAction) whose DoAction runs
when that line plays in-game — a general-purpose hook to give an item, fire a gameplay event, push
UI, and so on.

- Select the line and add an Action in its details panel.
- Pick or create a subclass of
ULBRAction. - Implement
DoAction(what happens at play time) and, optionally,GetLabel(a readable label shown on the line in the editor).
Gotcha
Actions are available on every line type except Cinematic and Comment. They run at play
time, not at generation — don't rely on them to change what gets generated.
See also: Dialogue Editor — actions · Runtime
How do I give lines to a voice with no body — a phone call, a narrator?
Use an intangible character. Derive it from ULBRIntangibleCharacter and add it to the
dialogue like any other character. It has no mesh and no actor in the level, so there is nothing to
place or spawn — it only speaks.
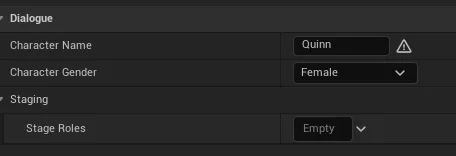
- Create a Blueprint from
ULBRIntangibleCharacter(no C++ needed). - Set its
CharacterName(localized). - Add it in the Dialogue Editor's character list and write its
Textlines.
Gotcha
Because it has no body, animation, lip-sync and camera tracks are skipped for it — only its
audio and subtitles are produced. (The CharacterGender property only feeds a TTS voice
fallback and can generally be ignored.)
See also: Intangible characters · Voices
How do I use a dialogue for a document or on-screen text instead of a played scene?
Tick Staging.Interface2D on its subdialogues and read it from your UI with the reading helpers —
this has its own page now. A document, a phone thread, a popup, a voicemail or a lock screen are all
covered, with a working example on the tutorial map: see
I want to show a dialogue in a UI instead of playing it
and, for pages, I want a document or a letter with several pages.
See also: Reading dialogues in 2D interfaces
How do I control exactly what the subtitle shows?
Subtitles are automatic — every played line becomes on-screen text (Speaker : line) with no
setup. To change what shows, you tune the shipped widget, swap in your own, use per-line flags, or
route subtitles into your existing HUD.
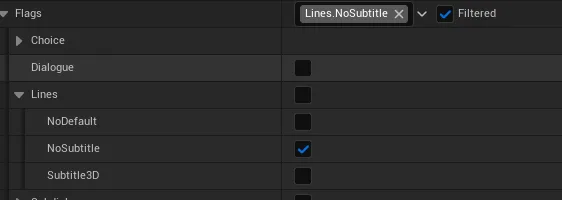
- Make your own from the shipped widget. Rather than editing
ULBRSimpleSubtitleWidgetin the plugin (which would fight future updates), duplicate/subclass it into your project and tune your copy — togglebShowSpeakerName, setFontSize, override the look — then point the setting below at it. - Swap the widget at Project Settings ▸ Libretto ▸ UI ▸ Widget Subtitle Class — any class
that implements the
LBRDialogueSubtitleinterface. - Override per line with flags: NoSubtitle (the line plays with no subtitle) and Subtitle3D (rendered in world space above the speaker's head, bark-style).
- Use your own HUD by binding the manager delegates
OnSubtitleDisplayed/OnSubtitleHiddenonULBRDialogueManagerinstead of letting Libretto spawn a widget.
Gotcha
Binding OnSubtitleDisplayed takes priority over the built-in widget — once bound, the
manager stops spawning WidgetSubtitleClass, so route the subtitles yourself. Subtitle3D
needs the speaker's actor to be present in the world; if it can't be resolved (e.g. a bark from
an absent character), nothing is shown and no error is raised.
See also: Subtitles · Choice widgets
The editor flags my words as misspelled — how do I fix it, or teach it new words?
The Dialogue Editor runs the Windows spell checker; a line with a mistake turns red and offers suggestions. For legitimate words it doesn't know — proper nouns, acronyms, invented terms — you add them once to a per-project dictionary and it stops flagging them everywhere.

- Read the flag. When a line contains an unknown word it turns red; the checker proposes the closest spellings from its dictionaries so you can correct the text in place.
- Teach it a word. For a word that is correct but unknown (a character name, an acronym…), add it
to the per-project dictionary at
Resources/Libretto/personalDictionary.dic— one entry per line. It is then accepted across every dialogue in the project. - Check a whole dialogue at once from Dialogue Tools ▸ Launch CheckSpeller rather than waiting to visit each line.
- Tune when it runs in Editor Preferences ▸ Dialogue Editor:
bLaunchCheckSpellerAtModification(check a line as you type it, on by default) andbLaunchCheckSpellerAtStart(sweep the whole dialogue when it opens, off by default).
Gotcha
The checker validates against the Windows language matching the editing culture (en →
en-US, fr → fr-FR); no dictionary ships with the plugin. For a culture Windows does not
have, nothing is flagged and the Output Log warns once (No Windows spell checker for
language…). To support another language, add it in Windows Settings ▸ Time & language ▸
Language & region and restart the editor. Lean on personalDictionary.dic for everything
project-specific rather than trying to silence individual lines.
See also: Dialogue Editor — Spell checking · Settings — Spell checker