Localization & import/export
This page covers the whole Libretto localization workflow and the CSV data exchange around dialogues: running a translation round end to end (setting up the target, watching lines move through their statuses, cutting a dated CSV batch, sending it out, and reimporting the translations), importing a dialogue from CSV, and exporting dialogues to CSV for review.
It is self-contained: everything about translating dialogues, the in-editor localization mechanics, CSV import/export and status tracking lives here.
Two kinds of localization
Libretto distinguishes two localization passes, each tracked by its own per-line status:
- Base loca — the base language (for us, English written from a French source) that is sent
out to be translated into every other language. It exists for pipelines that pre-translate into a
base language before translating into the shipping languages. If you write directly in the base
language, you never leave
Writingon it. - Multi loca — every other shipping language, translated from the base.
A third status, Audio, tracks the recording state and follows the same logic (export a batch, send it out for recording/retakes, reimport). It is not detailed here but behaves like the loca statuses.
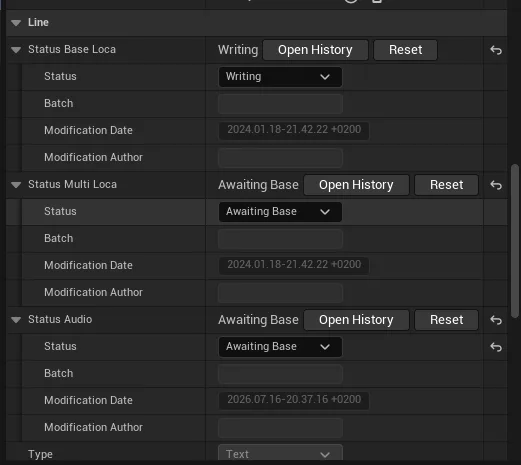
Each line therefore carries three statuses — Status Base Loca, Status Multi Loca,
Status Audio — visible in Line Details ▸ Line. Each shows its current Status, the last
Batch, the Modification Date and Modification Author, plus an Open History button (and a
Reset next to it).
1. Set up the target
Localization runs against a Localization Dashboard target (Tools ▸ Localization Dashboard). Every Dialogue you want to translate must belong to a target (a target named "Dialogues" is a good practice — you can have several).
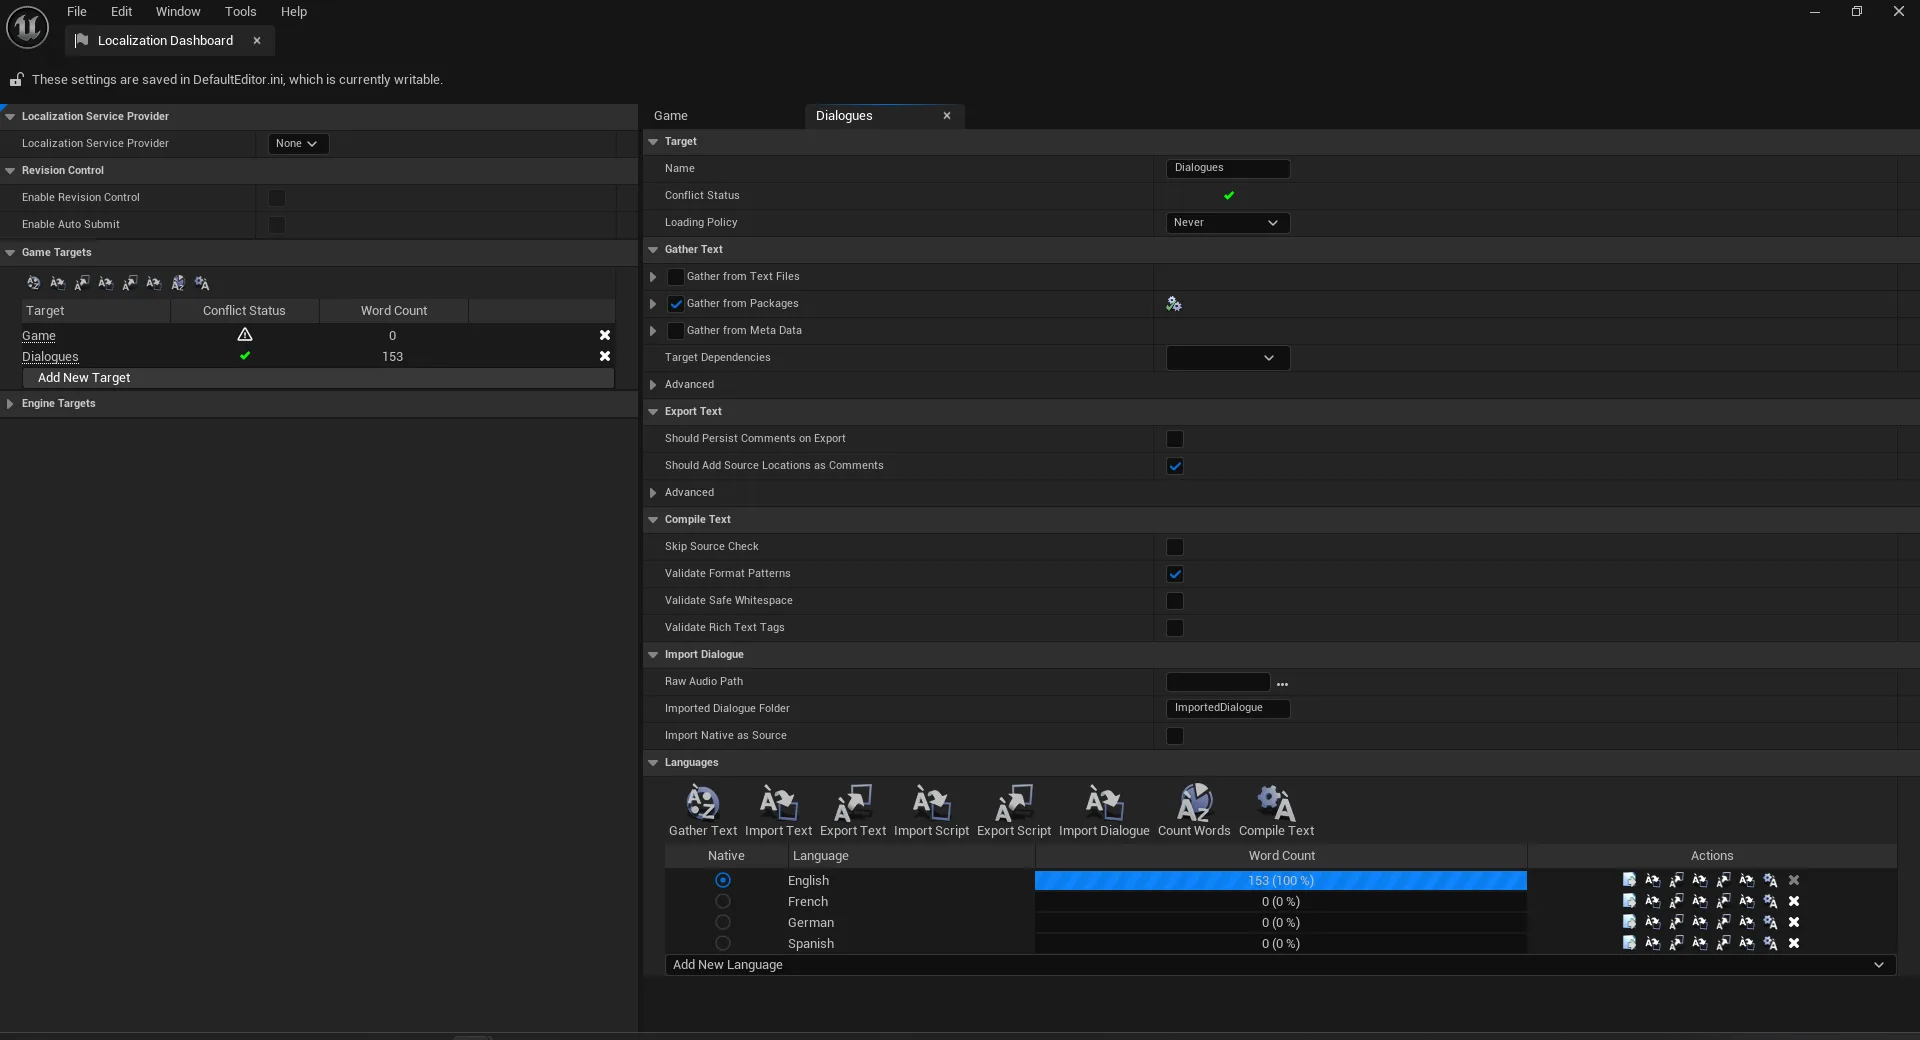
The one-time setup on the dashboard:
- Pick (or create) the localization target.
- Tick the box and set the path of the folder holding the dialogues to localize — append
/*so sub-folders are included. ⚠️ Untick the other "Gather from" boxes so only your dialogues are gathered. - Set the languages. The native language is the one the dialogues are written in; add the localized languages below it — you need at least one culture beyond the native one, or there is nothing to translate and exports are pointless.
- The per-culture word count / percentage of translated words is a quick progress overview across a round.
- The per-language edit icons open the translation-editing window. The Dialogue Editor does this for you, but the window is handy for corrections and debugging.
Run the initial Gather Text
Once the target is set up, run a Gather Text (button above the language list) to reference the existing dialogues — save them first. The editor does this automatically for new dialogues and future edits; the manual pass is only needed to bootstrap existing content.

Editing translations in the editor
You normally translate lines from within the Dialogue Editor rather than the dashboard window. Right-click a subdialogue in the list to open it in a specific language; you can then edit its translations directly.
- A line with no translation is shown in the native text (so you can see what to translate).
- Editing the native text of a line clears its translations, forcing a re-translation of the other languages.
- Copy/paste loses a line's localization — use paste special (right-click ▸ Paste special) to duplicate the localization and other associated assets along with the copied lines.
Source control
When a Dialogue is referenced for localization, text edits also change the .manifest/
.archive files under Content/Localization/<Target>[/<Language>]. Commit those together with
the Dialogue.
2. The status lifecycle
Statuses are how a line advances through a round. You can set them by hand in Line Details, but export and import also move them automatically. Here is the path a line follows.
A fresh line
A new line starts at MultiLoca AwaitingBase: it cannot be exported for multi-loca translation
until a base pass exists.
- If you use a base pre-translation pass, importing the base loca advances the line out of
AwaitingBase. - If you skip the base pass and translate directly, set the line to
ToLocalizeby hand when you want it picked up by an export.
ToLocalize is the gate: only lines at ToLocalize are exported (multi-loca export also picks
up MissingCulture lines — see below). Everything else is left alone.
The BaseLoca review flow
When a dialogue's text is settled, the intended flow is to move its lines to ToReview, then
the owners promote them to ToLocalize to make them eligible for export. Until a line reaches
ToLocalize, nothing goes out.
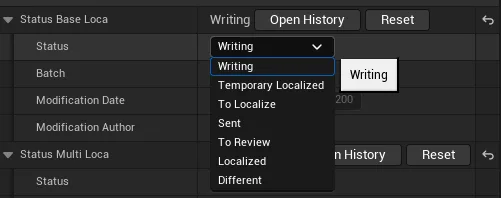
Full status lists (reference)
Verified against ELBRStatus*Type in LBRStatus.h (module LBRCore):
- BaseLoca:
Writing,TemporaryLocalized,ToLocalize,Sent,ToReview,Localized,Different - MultiLoca:
AwaitingBase,ToLocalize,Sent,Localized,MissingCulture,Different - Audio:
TtsToIntegrate,AwaitingBase,ToRecord,Sent,RecToIntegrate,RecIntegrated,ToRetake,SentToRetake,RetakeToIntegrate,MissingAudio,NoAudioNeeded
3. Export a batch
- In the Content Browser, select one or more Dialogues — a single batch can carry as many as you like.
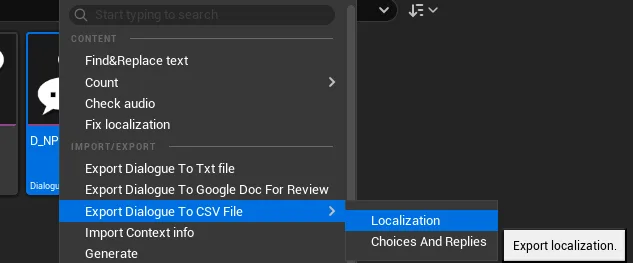
- Right-click ▸ Export Dialogue To CSV File ▸ Localization (in the Import/Export section of the asset context menu).
- The Export Localization Options window opens:
- Change Line(s) Status — when ticked, only lines at
ToLocalizeare exported and their status flips toSent(stamped with the batch). Leave it unticked to export text without touching any status. - Only missing localization — export only lines whose translation is still missing, per language.
- Skip Duplicate — skip duplicated strings.
- a checkbox per language to export (e.g.
fr). - Ok / Cancel.
- Change Line(s) Status — when ticked, only lines at
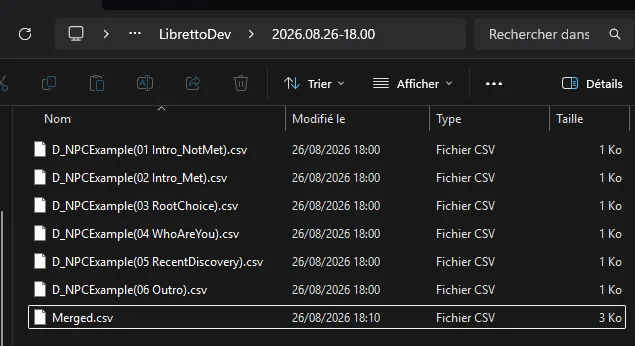
- Pick an output directory. Libretto creates a dated batch folder named
YYYY.MM.DD-HH.MM(e.g.2024.07.31-14.56) holding the CSVs to send out.
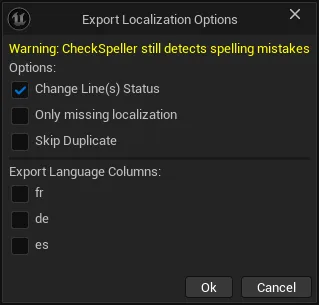
Whether the export writes BaseLoca or MultiLoca is inferred from the languages you exported: a
base-only export touches BaseLoca, otherwise MultiLoca.
Export can auto-submit to source control
When Change Line(s) Status is ticked, Libretto flips the exported lines to Sent and also
saves the affected Dialogue assets and submits them to source control — a single check-in
described "Export localization batch <batch>". This assumes the dialogues have no local
modifications before export (revert or submit first); if the check-in fails you are told to
commit or revert by hand. The check-in goes through Unreal's source control API, so it works
with any provider (Subversion, Perforce, Git...). To export without any source-control side
effect, leave Change Line(s) Status unticked.
The batch folder
The folder contains one CSV per dialogue (D_Barks_John.csv) plus a Merged.csv that
concatenates them all — the merged file is what you usually hand off. When a dialogue has more than
one subdialogue, the per-file names gain a subdialogue suffix; a single-subdialogue dialogue exports
as plain D_Barks_John.csv.
The CSV format
The separator is the pipe | (chosen because it almost never appears in dialogue text). The
header is fixed:
ID|SPEAKER|WORKSTRING|<culture…>|EMOTION|STAGEDIRECTION|CONTEXT|TYPE|NAMESPACE|INDEX|DIALOGUE|SUBDIALOGUE|<batch>
ID|SPEAKER|WORKSTRING|fr|EMOTION|STAGEDIRECTION|CONTEXT|TYPE|NAMESPACE|INDEX|DIALOGUE|SUBDIALOGUE|2024.07.31-14.56
13|BP_John_C [John]|Speak to me|||||Text|5B0E47C74A11D963A99B248E4CE1CDA8|8|D_Barks_John|Random_timed_barks
- One column per exported language, empty and waiting for the translation.
- The last header cell is the batch name.
SPEAKERisClassName [CharacterName](with(Off)when the speaker is the listener);NAMESPACEis the line's localization GUID;INDEXis the line's index within the subdialogue.- Files are CRLF-terminated; open the CSV in a spreadsheet rather than a text editor to fill the language column(s).

Saving the CSV back
Save as UTF-8, with the | separator only and the " string delimiter, and make sure
"Edit filter settings" is ticked when saving from LibreOffice. These exact settings apply to
every CSV Libretto reads (localization import, dialogue import).
4. Reimport the translations
Import via Import Localization in the Libretto toolbar dropdown of the main window, then pick the CSV(s) returned by translation. An Import Localization Options window then offers Change Lines Status and Trim Quotes.
Libretto matches each row back to its line automatically (by dialogue and index) and writes the translations into the Unreal localization target — you do not tell it which dialogue a row belongs to.
On a multi-loca import a line becomes Localized (or MissingCulture if some of its
languages are still untranslated); the batch is recorded on the status. On a base import,
BaseLoca becomes ToReview and any safeguarded MultiLoca is bumped to Different.
Status must match on import
A line's status is expected to be Sent (from the export) when its translation comes back. Each
row is matched to its line and its status checked: if it is Sent, the translation is
integrated; otherwise the whole import is cancelled and logged rather than half-applied.
You can also import through the Localization Dashboard's per-language Import Text buttons.
The subdialogue's translated tab now shows the imported text, and the line reads Localized with
its batch.
5. Re-editing a translated line — the Safeguard
Once a line is translated it is safeguarded: its status carries logistical and cost weight, so
Libretto guards against silently invalidating it. Editing the text of a safeguarded line raises a
Safeguard line <ID> popup:
You are trying to modify the text of a safeguarded line. Do you want to update the status to "Different" or don't modify the status ?
It shows a checkbox per affected status kind — Base loca / Multi loca / Audio — and three buttons:
- Update Status — the affected statuses go to
Different(Audio goes toToRetake); the line will be picked up again in a future batch to re-translate or re-record. - Keep Status — keep the current status; you accept that this line's subtitle is now out of sync with its translation (useful when you are too close to ship to re-translate).
- Cancel — abandon the text edit.
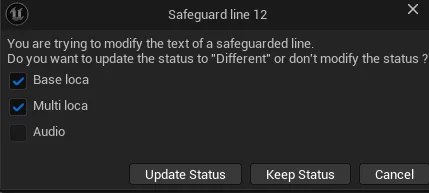
The safeguarded statuses are, per kind: BaseLoca Sent/ToReview/Localized, MultiLoca
Sent/Localized, Audio Sent/RecToIntegrate/RecIntegrated/SentToRetake/RetakeToIntegrate/MissingAudio.
Import-time Safeguard
A batch variant of the same guard fires during import when incoming text would overwrite safeguarded lines, listing every affected line at once.
History stored in the asset
Every status change records the date, author and batch, so each line keeps a full audit trail.
Open History (on any of the three status blocks in Line Details) opens, for example,
Status Multi Loca History for Line 13 of D_Barks_John — a table of
Status | Batch | Modification Date | Modification Author — walking the line from AwaitingBase
through ToLocalize, Sent (with the batch), to Localized.
This history lives inside the Dialogue asset itself (a ULBRStatusHistory object in the
dialogue's package), so it travels with the file and survives across machines.

Where the author comes from
The Modification Author is the UserName of your active source-control provider (Subversion,
Perforce...), read from its settings. When the provider has no user name (Git, or no source
control), Libretto uses your operating-system account name instead.
Import a dialogue from CSV
Besides localization CSVs, Libretto can create whole dialogues from a CSV of written lines. Use Import Dialogue in the Libretto toolbar dropdown of the main window (the button above the viewport). It takes one or more CSVs with this header:
| Column | Meaning |
|---|---|
| Title | The Dialogue name |
| Character | The character name |
| Intention | Maps to the line's Stage Direction |
| FP | (Final Pass) the line text |
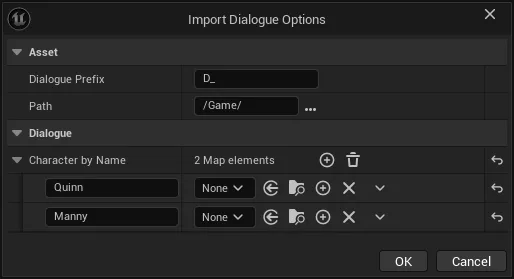
After picking the CSV(s), an options window asks for:
- a Dialogue name prefix (e.g.
D_QX_), - the path for the created dialogues — it must start with
/Game/(e.g./Game/Dialogues/QX), - a mapping from each character name found in the CSV to its Blueprint.
Dialogues are then created with their text and Speaker lines filled. If a Dialogue with that name already exists, the lines are appended to its first subdialogue rather than creating a new asset.
Step by step (from a spreadsheet)
- Export the sheet to CSV.
- Open it in LibreOffice.
- Make sure row 1 holds the headers (
Title,Character,Intention,FP); delete any rows above. The text to import must be in the FP column. - Save as UTF-8 with the
|separator (tick "Edit filter settings"). - Close LibreOffice.
- In Unreal, Import Dialogue.
- Fill the import window: a prefix (e.g.
D_QX_) and a path (e.g./Game/Dialogues/QX), then map the characters to their Blueprints (create the Blueprints beforehand to avoid mapping them by hand). - Check out / save the created or modified files.
Export dialogues to CSV
Right-click one or more Dialogues in the Content Browser for the export actions (in the Import/Export section of the asset context menu):
- Export Dialogue To CSV File ▸ Localization — the translation-round export described in Export a batch above.
- Export Dialogue To CSV File ▸ Choices And Replies — CSVs listing the dialogue's Choices and Replies (for reviewing branching without the full text pipeline).
- Fix localization — force every line that should be localized to be localized (you can untick
localization on individual
Textfields; this re-enables it where it was dropped).