Cameras
My generated shots look random — the camera doesn't point at whoever's talking
Make sure the camera rules are wired: a rule preset drives which camera films each shot, and each camera must declare the role it frames. Libretto doesn't hardcode the framing — for every cut it scores the stage's cameras and picks the highest. If no preset is resolved, or your cameras have no roles, that scoring has nothing to go on and the result looks arbitrary.
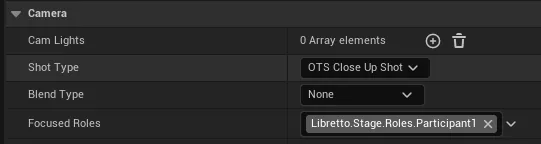
- Give each stage camera its
FocusedRoles— the role(s) it frames (Libretto.Stage.Roles.*), or a framing tag (Libretto.Stage.Framing.Wide/Group) for a shot not tied to a participant. This is what letsBP_CameraRule_FocusedCharacteraim a shot at the current speaker. - Make sure a rule preset is resolved. The plugin wires
BasePresetby default (viaDefaultLibretto.ini), so this usually just works. You can override it, first non-empty wins: Dialogue Instance → Stage (CameraRulesStageOverride) → Project Settings. - Generate Sequences and check the generation log
(
Saved/GenerationLog/Cameras/<Dialogue>.txt) to see, per shot, which rule scored which camera and why one was selected.
Gotcha
Two silent causes of "random" shots: cameras with empty FocusedRoles (the focus rule has
nothing to reward), and a subdialogue whose preset resolves to empty (no rule runs, so the
first candidate is taken). The log tells you which: if every camera scores 0, your rules aren't
firing; if scores look right but the wrong camera wins, a competing rule is out-weighing the
focus rule.
See also: Camera rules — picking a preset · Staging — create your own stage
I want to control the framing — close-ups, mediums, over-the-shoulder
Give the stage several cameras per role with different Shot Types, then bias the choice with a rule. Framing is emergent: the more framing options a role has, the more the rules can vary and shape the coverage. A role with a single camera always gets the same shot.
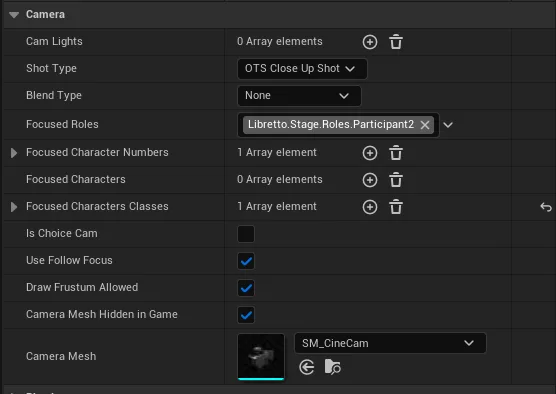
- Add several
ULBRStageCameraComponentper role and set each one'sShotType— nine values fromFullShotandMediumShotthroughCloseUpShot,ExtremeCloseUpShotand theOTS_*(over-the-shoulder) variants. Point them all at the same role viaFocusedRoles. - For an establishing or two-shot not tied to one participant, use a framing camera
(
FocusedRoles=Libretto.Stage.Framing.WideorGroup). - Steer which framing is chosen when by authoring a rule (e.g. alternate close-up ↔ medium,
favour close-ups on emotional beats). Rules score cameras by their
ShotType; see Authoring a custom rule. - Tune shot pacing globally with Min Shot Length / Max Shot Length (Project Settings,
defaults
2.0/9.0s) — they decide how lines are grouped or split into cuts.
Gotcha
Shot types describe framing intent; they don't move a camera. An OTS_CloseUpShot only
reads as over-the-shoulder if you actually place the camera behind a shoulder — the tag
tells the rules how to reason about it, not where it sits.
See also: Camera rules — stage cameras & shot types · Camera rules — authoring a rule
I want smooth blends between shots instead of hard cuts
Libretto cuts by default; you opt into blending at two independent levels. A hard cut reads as deliberate cinematography, so it is the default everywhere — but you can soften two different transitions: the one between shots inside a staged scene, and the one into and out of the whole staged view.
- Between shots — set a camera's
BlendType(ELBRBlendCameraType):None(default — cut),BlendIn,BlendOut, orBlendInOut. It controls whether the transition to/from that camera eases rather than snaps. - Into / out of the staged view — on the Dialogue Instance, set
EntryCameraBlendTimeandExitCameraBlendTime(category Dialogue ▸ Camera, default0= hard cut, up to ~2 s). Above zero, the gameplay view eases into the stage's first camera when the scene starts, and back to gameplay when it ends.
Gotcha
Entry/exit blend is a property of the Instance — a presentation choice, like the entry/exit transitions — so it can differ per placement, and a generic dialogue (no instance) falls back to a cut. The entry blend also freezes the outgoing gameplay image so the blend starts from what's actually on screen rather than from the pawn (which is being teleported to its mark) — that is what prevents a pop, and it only kicks in when the blend time is above zero. Tip: the showcase instance ties the blend to the Walk transition (blend when the character walks in, cut otherwise) — a pattern worth mirroring.
See also: Staging — entry/exit transitions · Perspective & control — staging modes
My character's head drifts out of frame when they move during a shot
Turn on Follow Focus so the camera tracks the head with an operator-like lag. Stage cameras are baked to a fixed transform, so a close-up that framed the head perfectly at the cut can lose it once the character sways or gestures. Follow Focus re-aims the active camera every frame to compensate — additively, so your authored composition is preserved and only the head's drift is corrected.
- On the stage camera component (Camera category), keep Use Follow Focus on — it is on by default.
- Tune the feel with three properties: Follow Start Delay (how long the camera holds still after the cut before reacting), Follow Dead Zone (degrees of drift ignored so idle jitter is not chased), and Follow Interp Speed (how firmly it catches up once moving).
Gotcha
Follow Focus engages only on a shot that frames exactly one character — wide/group shots and over-the-shoulder / two-shots keep their baked aim on purpose, so one moving head never drags a multi-character composition. It also corrects angular drift only (it rotates the aim, it does not dolly), so it is meant for a talking/gesturing character, not one walking across the room.
See also: Camera rules — follow focus · Animation & gestures
How do I see what each camera sees, and adjust it, without playing?
Select the camera to preview it, and press Pilot to fly it. A stage carries many cameras, so Libretto only reveals one at a time — the one you select — and lets you drive it directly in the viewport to frame the shot by eye.
- Turn on the master show flag Libretto Stage Previews and select the stage so its camera gizmos appear.
-
Select a single camera component in the stage's tree — a preview inset (PiP) shows exactly what that camera frames, so you can compare shots without generating.
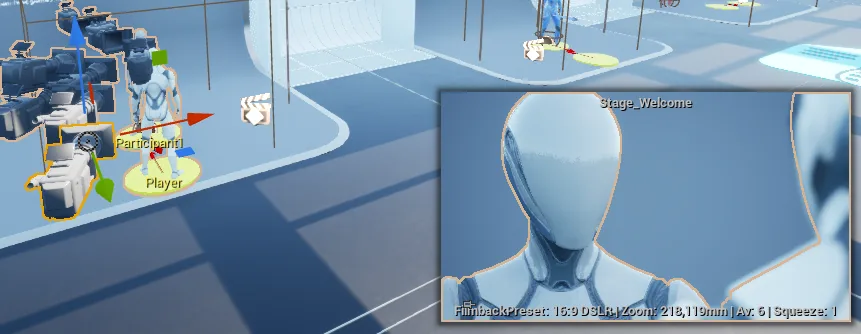 3. Press Pilot on that camera's Details panel to fly the viewport as the camera; move/rotate to
compose, then eject — the camera keeps the orientation you left it at.
3. Press Pilot on that camera's Details panel to fly the viewport as the camera; move/rotate to
compose, then eject — the camera keeps the orientation you left it at.
Gotcha
The preview PiP is per selected camera, by design — selecting the stage alone shows the gizmos but not a live inset, and the inset is suppressed while you're actively piloting (it would just duplicate the locked viewport). Framing you set by piloting is a normal edit of the camera component. It's usually easier to place a stage instance in a level and frame it there — against the real geometry the shot will actually see — then push the result back to the asset with the actor's Apply Instance Changes to Blueprint, rather than composing blind in the Blueprint editor.
See also: Staging — who stands where (previews) · Staging — create your own stage
My camera ends up looking at a wall, or the view snaps back to gameplay mid-scene
Give each role more than one camera, and make sure every stage has at least one valid camera. Two different mechanisms cause these symptoms — one is a runtime safety net you feed with alternatives, the other is an empty-cut fallback you avoid by always having a usable shot.
- Blocked by geometry — at playback, Libretto checks whether the cut camera is occluded and, if it is, switches to a sibling camera with the same focus that has a clear line of sight. So the fix is to author more than one camera per role: with no clear sibling, it has nothing to fall back to.
- View pops back to gameplay — a stage needs at least one valid camera, or the Camera Cuts track ends up empty and the view falls back to the gameplay camera. Check the log for shots with no selected camera.
- A silent stretch mid-scene — sub-sequences that carry only logic (routing, no lines) inherit the last selected camera rather than popping the view, so a gap shouldn't cut to gameplay; if it does, it's usually case 2 in that segment.
Gotcha
The occlusion fallback only swaps to a camera with the same focus — a lone camera on a role, or siblings that all share the same blocked angle, leaves nothing to switch to. Spread a role's cameras around different angles so at least one is likely to have a clear shot.
See also: Camera rules — runtime behaviour · Runtime
I want a dedicated shot for player choices — and why aren't the player's lines filmed?
Mark a camera as a choice cam, and voice player lines as real Text lines. Choice moments and player replies are handled specially by the camera system, so both need a small deliberate step.
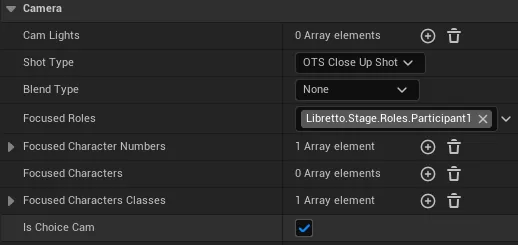
- For a choice shot, tick
bIsChoiceCamon the camera you want used while the player is choosing.BP_CameraRule_Choice(inBasePreset) then favours it on any shot that contains a choice. - Player Reply lines are not filmed as spoken shots by design — camera selection builds its
shots from
TextandChoicelines only. To give the player their own on-screen shot, write a realTextline spoken by the player character (a common authoring pattern) instead of relying on the Reply's display text.
Gotcha
A choice cam is only picked when the shot actually contains a choice — it isn't a general
"player camera". If your player character needs coverage during normal back-and-forth, that
comes from ordinary cameras framing the player's role plus voiced Text lines, not from
bIsChoiceCam.
See also: Camera rules — runtime behaviour · Writing — branch with choices