Camera Rules
When Libretto generates a dialogue sequence, it films the conversation for you: every shot (a camera cut) is assigned to one of the stage's cameras. The choice is not hardcoded — it is driven by a small scoring system. Each camera rule grades every candidate camera for the current shot, the grades are summed, and the highest-scoring camera wins the cut.
This page explains where those rules live, how the generator picks which set to apply, how scoring works, how to read the generation log, which rules ship with the plugin, and how to author your own.
Rule presets: a FLBRCameraRulesPreset DataTable
Rules are grouped into presets. A preset is a row of a DataTable whose row structure is
FLBRCameraRulesPreset (module LBRSequenceGenerator). The structure has a single field,
Project Camera Rules — an array of camera-rule classes (each a ULBRDialogueCameraRule).
The plugin ships one such table, DT_CameraRulesPresets under /Libretto/CameraRules/, with a
row named BasePreset. Out of the box BasePreset lists eight rules:
BP_CameraRule_30DegreeBP_CameraRule_ChoiceBP_CameraRule_CloseMCBP_CameraRule_CloseThoughtBP_CameraRule_DisplayEmotionBP_CameraRule_FocusedCharacterBP_CameraRule_MediumShotBP_CameraRule_ReuseMedium
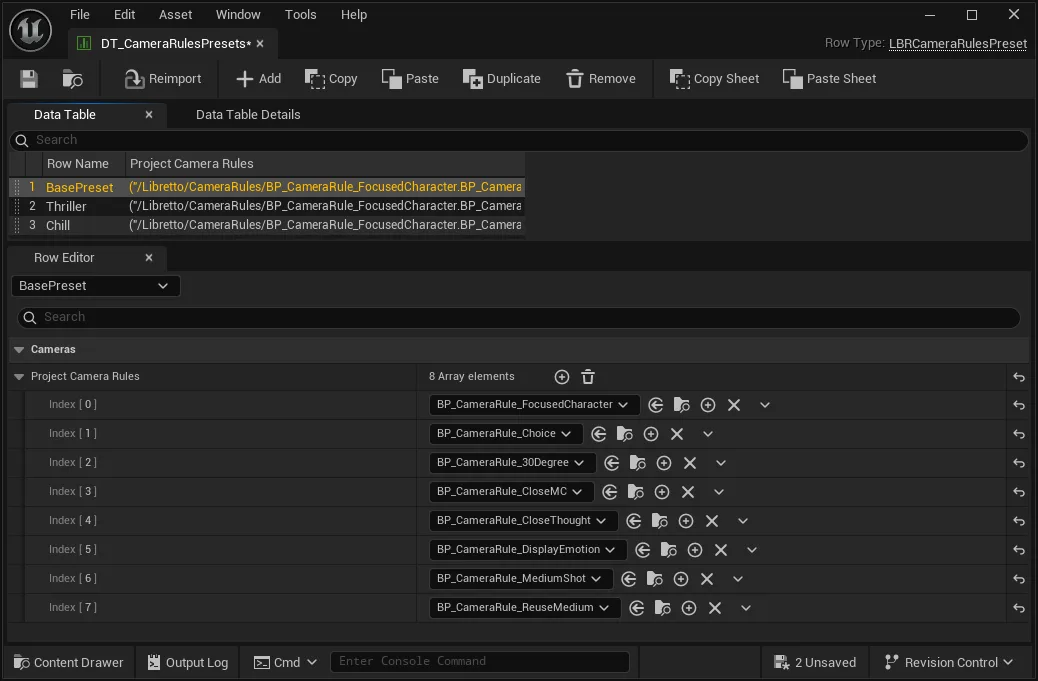
BP_CameraRule_FocusedCharacter is the rule that does the heavy lifting: it favours a camera that
shows the character speaking at the start of the shot's time range, so shots point at whoever is
talking instead of picking a camera at random.
Tip
To use your own set of rules, create a new DataTable (Row Structure FLBRCameraRulesPreset),
add a row, and fill its Project Camera Rules array. Then point one of the three resolution
levels below at that table + row.
How the generator picks a preset
For each subdialogue, the generator resolves which preset to use in this priority order — the first non-empty one wins:
- The Dialogue Instance — its
CameraRulesPresetproperty (category Staging), if the subdialogue is played through a placed instance that sets one. - The Stage — the stage class's
CameraRulesStageOverride(its Camera Rules Stage Override in Class Defaults). - Project Settings —
ProjectCameraRulesunder Project Settings ▸ Libretto - Sequence Generator ▸ Cameras, used as the fallback.
In code the fallback is loaded first, then overwritten by the stage's value if set, then by the
instance's value if set (LBRCameraTrackGenerator::InitSubDialogue).
Wired by default
ProjectCameraRules is set out of the box in the plugin's DefaultLibretto.ini to
DT_CameraRulesPresets / BasePreset, so generated shots target the speaker immediately. You
can override it per stage or per instance.

Stage cameras and shot types
A stage's cameras are ULBRStageCameraComponent components — cine cameras that a rule can
inspect. Two properties matter most for rule authoring:
- Shot Type — an
ELBRShotTypedescribing the framing (see below). - Blend Type — an
ELBRBlendCameraType(None,BlendIn,BlendOut,BlendInOut).
The ELBRShotType enum has nine values:
| Value | |
|---|---|
FullShot |
MediumShot |
AmericanShot |
MediumCloseUpShot |
CloseUpShot |
ExtremeCloseUpShot |
OTS_MediumCloseUpShot |
OTS_CloseUpShot |
LongShot |
A stage typically exposes several cameras per participant — for example a close-up and a medium on each slot, plus over-/under-shoulder variants and a dedicated choice camera. Rules read these shot types to reason about framing.
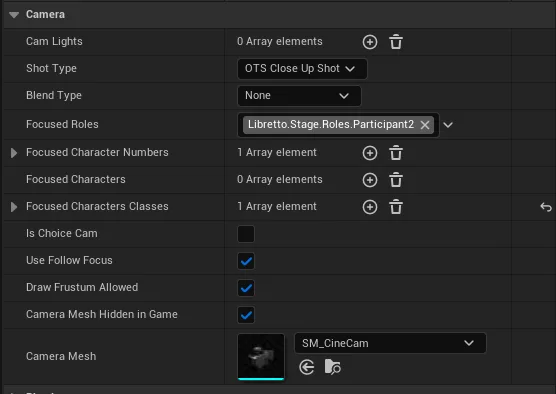
Follow focus: keeping the head framed
A stage camera is baked with a static transform — it does not move during a shot. When the framed
character animates (idle sway, gestures), their head drifts and can slide out of the composition. The
Follow Focus properties on ULBRStageCameraComponent let the active camera re-aim every frame to
keep the head framed, with a deliberately soft, operator-like lag.
The correction is additive: it preserves your authored framing (over-the-shoulder, rule of thirds…) and only compensates the head's angular drift since the shot started. It never re-centres the head or overrides the composition — it just nudges the aim to follow the movement.
| Property | Default | Role |
|---|---|---|
| Use Follow Focus | true |
Master switch. When off, the camera keeps its baked transform. |
| Follow Start Delay | 0.35 s |
Reaction delay after each cut: the camera holds its baked framing for this long, then the follow eases in. Emulates an operator reacting a beat late at the start of a shot. |
| Follow Dead Zone | 2.0° |
The head may drift this many degrees before the camera reacts. The dead zone is subtracted from the correction (no snap when crossing the threshold), so idle micro-movement never makes the framing jitter. |
| Follow Interp Speed | 3.0 |
Catch-up stiffness once the follow is active — lower is softer/laggier, higher is snappier. 0 tracks instantly. |
The three timing properties compose into the operator feel: the camera reacts a beat late (Start Delay), ignores small tremors (Dead Zone), then catches up smoothly (Interp Speed).
Only single-focus shots follow
The follow engages only when the camera frames exactly one character. A wide/group shot (no focus) or an over-the-shoulder / two-shot (several focused characters) keeps its baked aim, so the composition of multi-character shots is never disturbed.
Set these per camera in the component's Camera category in the Details panel. The follow state resets on every cut, so each new shot re-captures the head's rest position before applying the delay, dead zone and smoothing.
Shot length and cut placement
Two Project Settings bound how long a single shot lasts:
- Min Shot Length — default
2.0s. - Max Shot Length — default
9.0s.
Cut boundaries are derived deterministically from line durations: a line that fits inside the min/max window becomes one shot; a line longer than the max is split across several shots; a line too short is merged into the previous shot (or borrows a slice of the next). This is why a single shot can contain several short lines, or a cut can land mid-line.
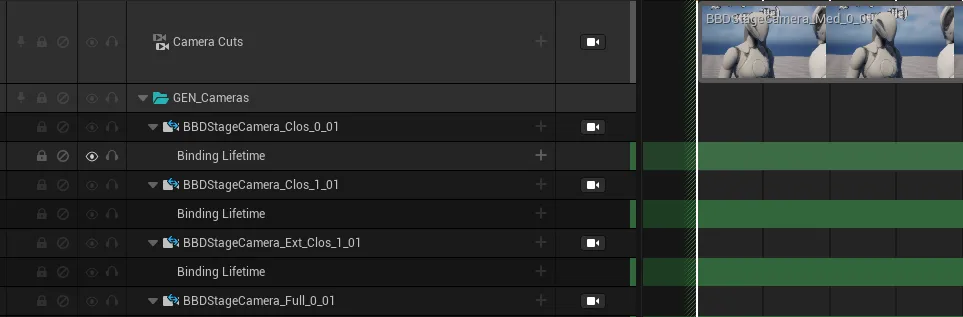
The generated cuts live on the Camera Cuts track of each level sequence, with the cameras
gathered in a GEN_Cameras folder.
Scoring: EvaluateScore
Each rule scores a candidate camera through EvaluateScore, a Blueprint-implementable event
on ULBRDialogueCameraRule:
int32 EvaluateScore(ULBRStageCameraComponent* CameraToTest, FCameraRuleData InputData)
- Camera To Test — the candidate camera being graded.
- Input Data — an
FCameraRuleDatacontext struct. Break it to get:- Dialogue — the dialogue being generated.
- Line ID — the ID of the line at the start of the shot.
- Is Choice — whether this shot contains a choice.
- Previous Cameras — an array of the shot's possible predecessor cameras.
- Return Value — an
int32score. Returning0means the rule has no opinion about this camera. Any other value nudges the choice up or down; the exact scale is entirely up to you and your cinematic designers to model and balance.
For each shot, the selector runs every rule against every camera. The per-rule integer scores are summed into a per-camera weight (a float), and the camera with the highest weight is selected.
Previous Cameras can hold more than one entry
On the first shot of a sequence that is reachable from several branches of the dialogue, the array may contain several predecessors. On a simple linear sequence it holds zero (very first shot) or one (the preceding shot in the same sequence).
The generation log
Every generation writes a log so you can verify how the rules were applied and iterate on the balance. It is written to:
<Project>/Saved/GenerationLog/Cameras/<DialogueName>.txt
The file is rewritten in full on each generation. Per sequence, it contains:
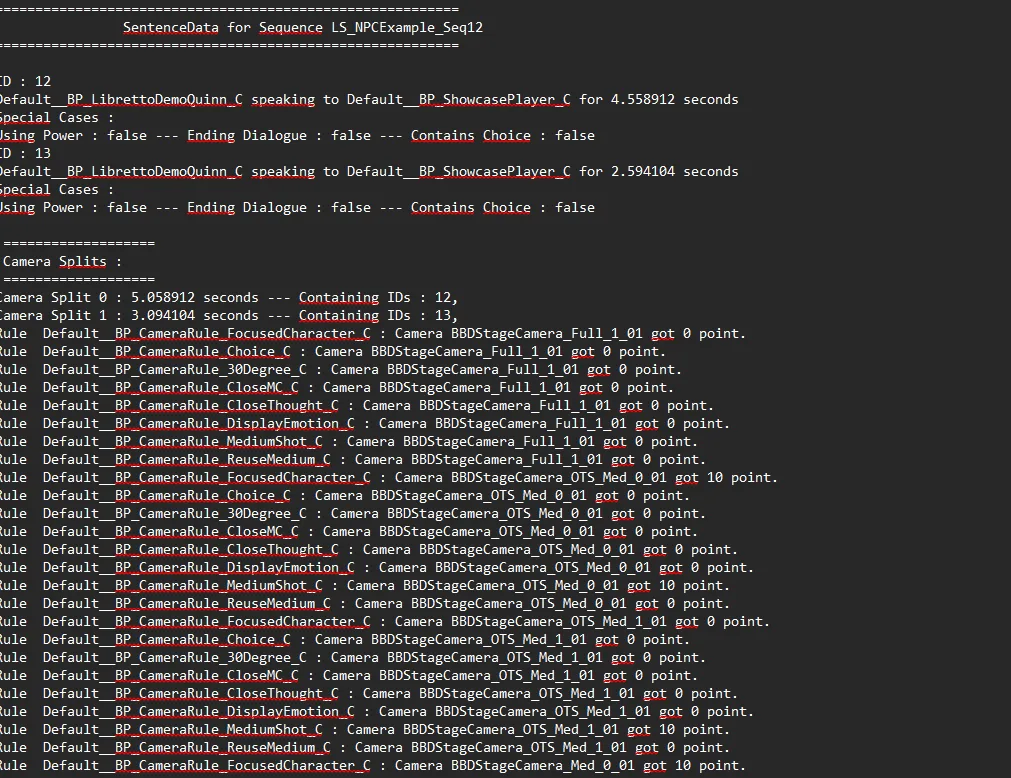
- Sentence data — a recap of each line (its ID, speaker, listener, duration and any special cases such as Contains Choice).
- Camera Splits — each shot with its duration and the IDs of the lines it covers.
-
Per-rule scores — for each shot, one line per rule × camera, e.g.:
Rule Default__BP_CameraRule_FocusedCharacter_C : Camera Slot1Medium_0 got 10 point. -
Weight summary and selection:
---------- Shot Camera Weights ----------
Slot1Medium_0 : 10.0
Slot1Closeup_3 : 10.0
Choice1_5 : 10.0
Camera selected : Slot1Closeup_3
The selected camera on a choice shot is additionally annotated with
-- Choice Cam; a camera focusing a character is annotated with-- Focusing <Character>.
Reading a real log: with only FocusedCharacter active, the cameras that frame the current speaker
receive its points and one of them is selected. Add a second rule and its scores are added to
the same weights — a camera that both frames the speaker (+10) and satisfies the second rule (+20)
ends up at 30 and wins.
Rules shipped with the plugin
All shipped rules live under /Libretto/CameraRules/:
| Rule | Intent |
|---|---|
BP_CameraRule_FocusedCharacter |
Favour a camera that frames whoever is speaking at the start of the shot. |
BP_CameraRule_Choice |
Favour the dedicated choice camera on shots that contain a choice. |
BP_CameraRule_30Degree |
Bias against cuts that violate the 30-degree rule between consecutive cameras. |
BP_CameraRule_MediumShot |
Bias toward medium framings. |
BP_CameraRule_CloseMC |
Bias toward medium-close-up framings. |
BP_CameraRule_CloseThought |
Bias framing for internal/thought lines. |
BP_CameraRule_DisplayEmotion |
Bias framing to emphasise emotional beats. |
BP_CameraRule_ReuseMedium |
Encourage reusing a medium camera for continuity. |
Info
These rule assets are Blueprints; their exact scoring is defined in each Blueprint's
EvaluateScore graph rather than in C++, and the summaries above describe intent from their
names. /Libretto/CameraRules/ also contains BP_CameraRule_RandomListener, which exists as
an asset but is not part of the shipped BasePreset — add it to a preset yourself if you
want it.
Authoring a custom rule
The following walks through a rule that alternates framing: after a close-up, reward medium/full framings; after a medium/full, reward a close-up.
-
Create the Blueprint. Right-click in the Content Browser ▸ Blueprint Class, and in Pick Parent Class search "camera rule" and choose
ULBRDialogueCameraRule. Name it, by convention,BP_CameraRule_<Something>.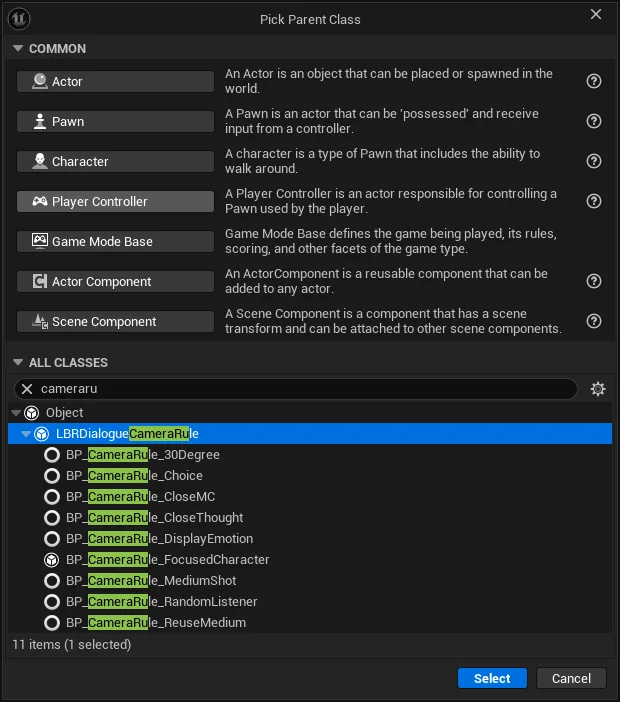
-
Override
EvaluateScore(category Evaluation in My Blueprint ▸ Functions). The default graph just returns the parent's result.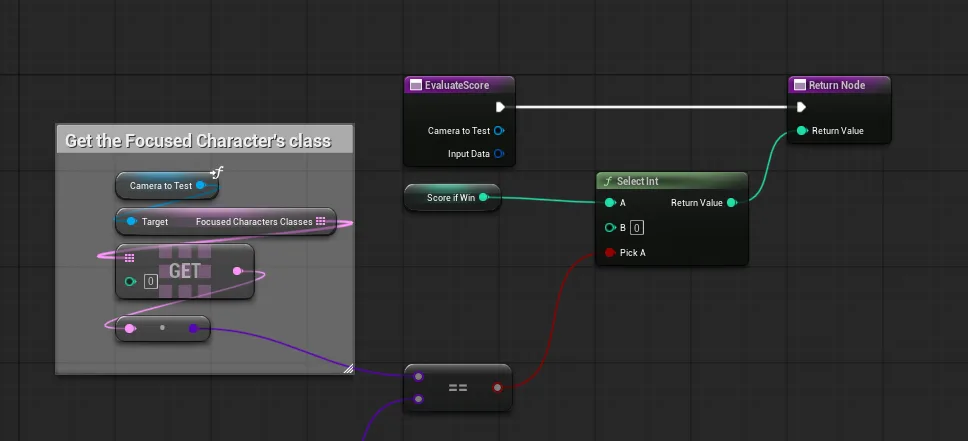
-
Break the context. Add a Break
CameraRuleDatanode on Input Data to expose Dialogue, Line ID, Is Choice and Previous Cameras.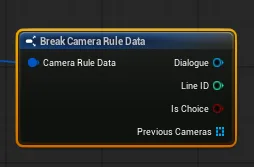
-
Handle the empty case. If Previous Cameras Is Empty, there is nothing to alternate against — Return 0.
-
Read the previous framing. Otherwise Get index 0 of Previous Cameras, read its Shot Type, and
Switch on ELBRShotType. -
Compare with the candidate. For the relevant branches, read the Shot Type of Camera To Test and switch again:
- previous was full/medium and the candidate is a close-up → Return 20 (reward the change);
- previous was full/medium and the candidate is full/medium → Return -20 (penalise repetition);
- symmetrically for a previous close-up.
-
Compile.
-
Wire it in. Open your preset DataTable, and in the row's Project Camera Rules array click + to add your new rule. Re-generate the dialogue.
In the regenerated log, your rule now contributes +20 / -20 alongside FocusedCharacter's
+10, and the selected cameras alternate framing while still pointing at the right speaker — the
final weight is simply the sum of every rule's score.
Tip
Return 0 liberally. A rule that only speaks up in the situations it cares about composes
cleanly with the others; a rule that always returns non-zero can drown out FocusedCharacter
and send shots off the speaker.
Runtime behaviour
Rules run at generation time to place the cuts. At playback time, Libretto additionally guards against a chosen camera being blocked in the actual scene.
Occlusion fallback
When a stage camera cut plays, the dialogue manager checks whether the cut camera is occluded
(ULBRDialogueManager::HandleStageCameraCut runs an occlusion sweep via
ALBRDialogueStageActor::CalculateCamerasCompValidation). If the selected camera is blocked, it
switches to a sibling camera with the same focus that has a clear line of sight, so the
speaker stays on screen.
Player lines and camera cutting
Camera selection builds its shot data from Text and Choice lines only — player Reply
lines are not filmed as spoken shots by design. To give the player their own on-screen
shots, voice them with real Text lines (a common authoring pattern) rather than relying on
Reply text.